
Now that you’ve created your rental Rate Programs, it's time to add some Collections and Rental Products so customers can start making reservations. Article: Create rental Rate programs
Rental Collections are the container for the individual Rental Products which all use the same rental rates. If you use the same rental rates for your entire rental fleet, you can also use Collections to organize different categories of your fleet, much like you’d use the regular categories in your system to organize your in-store products.
Rental Products, like your in-store products, are the models which are available for rental. Rental Items are the individual items that customers will take out of the store.
To create and edit Collections, Rental Products, and Rental Items in Ascend, users need the Reservations - Manage Collections and/or Reservations - Manage Resources user permissions. (multi-store retailers) Collections and Rental Products automatically share between your locations. Rental Items are unique to each location.
Create a Collection
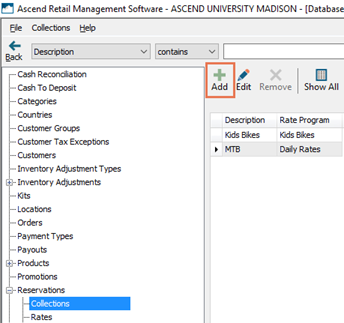
- From the Ascend Desktop, click the Reservations tile.

- Expand Reservations (in the left pane) and select Collections.
- On the toolbar, click the Add button.
- In the Description field, enter a meaningful name. This name does not display to your customers, so it should be a name which adequately describes the Collection to your employees.
- From the Rate Program dropdown, select the charges which should apply to this Collection.
- Click the Save button.
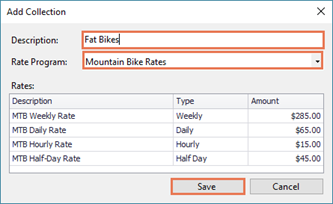
When a Rate Program is in use, its configured Rates display in the Rates section. They also display in the Rates tab on the lower pane in Database Explorer.
Collections may also be created by importing Rental Products from a spreadsheet. Collections created via import are automatically assigned the $0 SYSTEM DEFAULT RATE.
Rates and Rental Products are view-only in the Collections area of Ascend. If you need to make changes, navigate to appropriate section in Database Explorer to make modifications.
Collections with no attached Rental Products (including those at another location) can be hidden using the Remove button.
Create a Rental Product
Note: You can Import a large number of Rental Products into Ascend
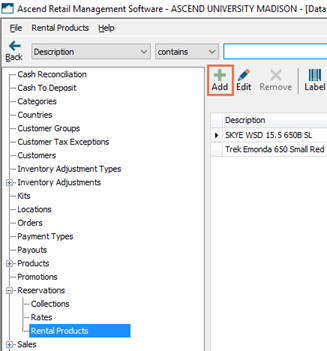
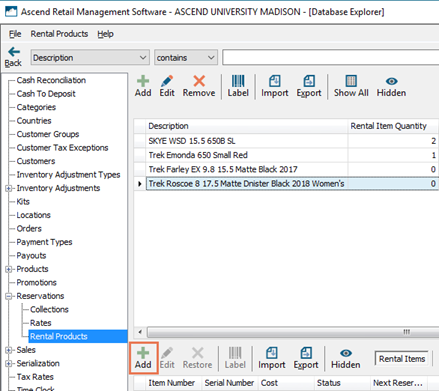
- Navigate to Database Explorer > Reservations > Rental Products.
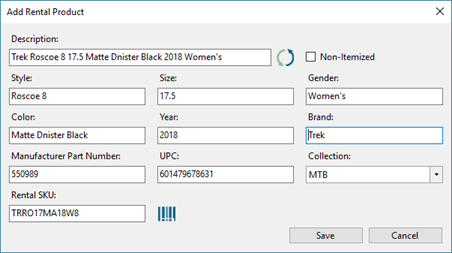
- On the toolbar, click the Add button.
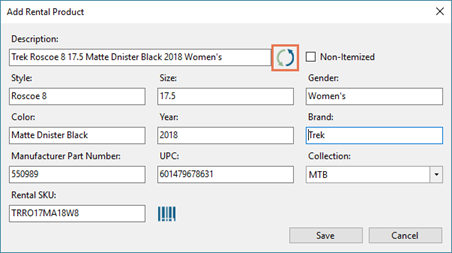
- (optional) Enter information about the product to automatically generate a Description.
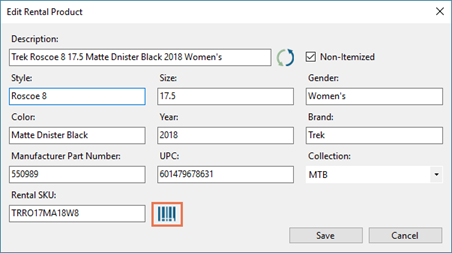
- Style: Enter the style or model name (e.g. Farley, Circuit WaveCel Helmet).
- Size: Enter the product’s size
- Gender: Enter the gender for whom the product was designed.
- Color: Enter the color name.
- Year: Enter the model year.
- Brand: Enter the manufacturer’s brand name.
- If desired, you can also enter your own Description or adjust the automatically generated text. To reset the Description to the automatically generated text, click the Auto Generate Description icon.
- (optional) Check Non-Itemized if you do not wish to track individual Rental Items.
- Note: If a product is Non-Itemized, you can still keep track of the total number you have available for reservation – however, you cannot mark a Non-Itemized item as Out of Service. This option is great for items like helmets, shoes, pedals, etc.
- (optional) In the Manufacturer Part Number field, enter the manufacturer’s part number for the product.
- (optional) In the UPC field, enter the UPC or EAN for the product.
- From the Collection dropdown, select the Collection to which the product belongs. The Collection selected controls the Rates which apply to Reservations for the product.
- The Rental SKU is automatically generated based on the product information entered in step 3. If desired, you can enter a more memorable SKU.
- Note: A maximum of 12 characters (including spaces) can be entered. To print a label(s) with the Rental SKU for the item to keep at your register(s), click the Label icon.
- Note: A maximum of 12 characters (including spaces) can be entered. To print a label(s) with the Rental SKU for the item to keep at your register(s), click the Label icon.
- Click the Save button.
Rental Products with no attached Rental Items (including those at another location) can be hidden using the Remove button.
Add Rental Items
Note: You can Import a large number of Rental Products into Ascend.
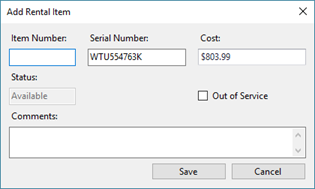
- In the upper pane, select the Rental Product you just created.
- In the lower pane, click the Add button.
Itemized products
- (optional) In the Item Number field, enter your store’s identifier for the item.
- Note: If a Serial Number is entered and Item Number is left blank, the Serial Number is also used for the Item Number upon saving.
- (optional) In the Serial Number field, enter the item’s serial number.
- Note: Either the Item Number or Serial Number field is required.
- (optional) In the Cost field, enter the amount you paid for the item.
- (view-only) The Status field displays information about the item’s availability.
- Check Out of Service if the item is temporarily unavailable for rental (e.g. it requires repair).
- (optional) In the Comments field, enter any additional information employees need to know about the item.
- Click the Save button.
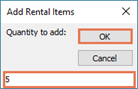
Non-Itemized products
- In the Quantity to add field, enter the total number of items you have for that product and click the OK button.
- If desired, double-click the item in the lower pane to adjust its Cost.
Rental Items with no open Reservations can be hidden using the Remove button.
Additional Resources
KB22-210