
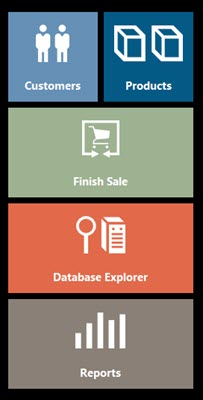
Your Ascend desktop is your key to everything Ascend. The tiles are completely customizable, so you can create a layout that fits your specific needs.
- Open the Ascend app. You are prompted to login.

- Select your username from the User dropdown menu and type your password.
- You can also check the Punch In box if it is the beginning of your shift.
- Click Sign in.

- Ascend automatically opens to the Ascend desktop.
- Note: If it’s your first time logging into Ascend, your desktop will have a default layout that displays all the tiles you have access to, depending on your User Permissions.
- Any changes to the layout are specific to you - so your changes won’t affect your coworkers’ desktops and you’ll see the same layout anywhere you sign into Ascend in your shop.
- Note: If it’s your first time logging into Ascend, your desktop will have a default layout that displays all the tiles you have access to, depending on your User Permissions.

- To edit the tiles, right-click on your mouse anywhere on the Ascend desktop and select Unlock Desktop from the dropdown menu.

- Your desktop background turns black, indicating that the desktop is in “editing mode” and the tiles are inactive.

- Click - and hold the tile to drag and drop them to a different area of the screen. You can easily arrange all your tiles in a way that makes the most sense for you.

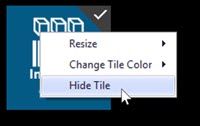
- Right-click on a tile to change its color or size.
- If you click Resize you can choose from:
- Small - the default for most tiles
- Wide - which is the size of two small tiles side-by-side
-
Large - which is a box the size of four small tiles

- If you click Change Tile Color in the same menu, you can choose from:
- Light blue
- Dark blue
- Green
- Orange
- Slate
- If you click Resize you can choose from:
- You can hide tiles if your desktop is feeling too cluttered. Just right-click on a tile and select Hide Tile in the menu to remove that tile from your desktop.
Note: If you accidentally hide a tile you want to see, right-click on a blank part of the screen, go to Show Tile, and select the tile you want to add to your desktop.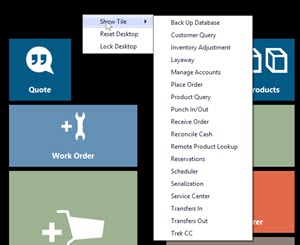
- Once your tiles are set, right-click on a blank part of the window and select Lock Desktop.
How do I access certain areas in Ascend that I only use Occasionally?
If you know you’ll need to access a certain area of Ascend occasionally - but you don’t want to see the tile - take a look at the menus on the upper left part of the screen. Everything that can be accessed with tiles can be accessed here.

You can add product, customer, or vendor information, and any transaction type, under Create.
Everything in Database Explorer can be opened directly under the View menu. For example, when you select View > Customers, Ascend opens the Customer area of Database Explorer.
Additional Resources
KB22-173