There are a couple ways a tax rate can be changed in a sale, depending on how/why the rate is different. Make sure to double-check which method is right for your situation.
Always check your local and state tax laws before overriding tax rates. You may be liable for paying sales tax even if you did not collect it from the customer(s).
Modify the tax rate on a sales item
If this is a one time situation where the sale, customer, or sales item(s) should not be taxed, you can update the sales item(s) tax rate during the sale.
Any tax changes to the sales item(s) will not affect the product or customer in future sales.
- Double-click the sales item you want to edit.
- Select the Edit icon next to the Tax Rate field.

- Update the boxes in the Sales Item column in the grid to match the item's approved rate.
- The updated rate shows in the Effective Tax Rate field on the bottom of the window.

- Select Save on the Tax Rates window.

- Select Save in the Sales Item window.

Make a Customer tax-exempt
To edit this information during a transaction, a customer must be attached to the sale. Customers that commonly get tax discounts or are exempt from taxes include: out-of-state customers, non-profits, schools, and police departments. Check with your manager or owner to see what customers are tax-exempt at your store.
- Click on the Customer name in the Customer Panel.

- Locate the Tax area on the upper right.
- Add a Tax ID, if needed.
- Select a Tax Exception Reason from the drop-down menu.
- Update the boxes in the Customer column in the grid to match the customer's approved rate.
- The current tax rate for the customer is noted at the top of the tax area. For example: Tax - current rate 5.000.

- Select Save or Apply.
Modify the Tax Rate on a Product
Some products or SKUs aren't taxed at some shops. This usually includes Labor SKUs. Double-check with your manager or owner before changing anything if you believe a product should not be taxed.
You can edit the product record from a sale or from Database Explorer outside of a sale. These directions assume you are starting in a sale.
- Double-click the sales item you want to edit.
- Select the Edit Product icon to open the product record.

- Click the Edit icon next to the Tax Rate field to edit the tax rate.

- Update the boxes in the Product column in the grid to match the product's approved rate.
- The updated rate shows in the Effective Tax Rate field on the bottom of the window.

- Select Save in the Tax Rates window.
- Click Save or Apply in the product record to save the changes.
Override the tax settings for a Coupon
You cannot override a Coupon's tax setting in a sale. You will need to exit the sale to make this change.
- From the Ascend desktop click View > Payment Types.
- Highlight the Coupon payment type.
- Find the coupon you want to edit in the lower part of the screen.

- Double-click the coupon.
- You can select with Pre-Tax or Post-Tax for this coupon.
- Pre-Tax: the coupon amount is applied to the sale before tax has been calculated. So the "discounted transaction balance" is taxed, not the "full transaction balance".
- Post-Tax: the coupon amount is applied to the sale after tax has been calculated. So the "full transaction balance" is taxed.

- Select Save after you've made your selection.
Now you can return to the sale and apply the coupon.
Change the tax settings for a Trade-In item
- Select the Trade-In payment type in the transaction.
- Fill out the Trade-in product information like normal.
- Use the Apply Amount drop-down menu to select how the trade-in should affect tax in this sale.
- Pre-Tax: the trade-in amount is applied to the sale before tax has been calculated. So the "discounted transaction balance" is taxed, not the "full transaction balance".
- Post-Tax: the trade-in amount is applied to the sale after tax has been calculated. So the "full transaction balance" is taxed.

- Then select Save.
Note: If you cannot edit the tax rate in any of these situations, you may not have the user permissions to do so. Reach out to your manager for a hand changing the tax rates or changing your user permissions (depending on your store's policies for use permissions).
The tax-related User permissions include:
- Tax - Edit Customer Tax Exceptions,
- Tax - Sales Item Tax Override,
- Payment Types (for coupon tax rates),
- Products/Vendor Products - Add/Edit Master Data (for product/SKU tax rates),
- and possibly Advanced Payments, depending on if Trade-ins are marked as advanced payment types at your store.
For more information on permissions, check out our article, Users - User Permissions.
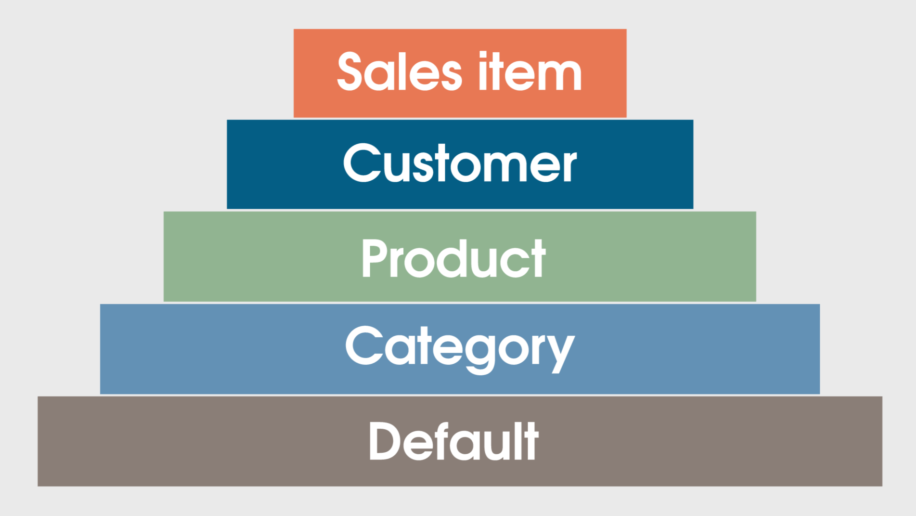
If you have multiple tax rate overrides in effect for a sale item, the rate that applies depends on where it's at in the tax rate hierarchy:
- If a sale item has a tax rate set, the Sales Item rate is used.
- If no tax rate is set on the sale item and the customer has a tax rate set, the Customer rate is used.
- If no tax rate is set on the sale item or customer and the product has a tax rate set, the Product rate is used.
- If no tax rate is set on the sale item, customer, or product and the category has a tax rate set, the Category rate is used.
- If no tax rates are overridden, the Default rate is used.

Additional Resources
KB22-133
