
When errors happen during a sale, they are easiest to fix on the same day.
Review your Activity Summary report at the end of each day to catch (and fix) errors while it's easy to do something about the error.
Fixing a payment error on the same day
Ascend offers a wide variety of payment options, which means there are different rules for removing or revising those payments. Find the section below that matches the payment type you are working with.
Ascend Pay
- Ascend Pay - Process a Return
- Ascend Pay - Process a Refund (Same Day Void)
- Ascend Pay - Process a Remote Refund
Chase integrated Debit Cards/Gift Cards
- Open the transaction in Ascend.
- In the Comments field, explain what happened.
- Make sure the sales item(s) price match what the customer should be charged - you might be adding/removing/replacing an item, adding a discount, etc.

- Select the correct payment type (the one that was added incorrectly earlier).
- In the Amount field, enter the amount difference (between the current payment and the correct payment).
- If the person was undercharged, you're adding a positive amount - AKA another payment, such as $15.99.
- If the person was overcharged, you're adding a negative amount - AKA a partial or full refund such as (-$15.99).
- Note: Debit payments must be refunded (returned) as Credit. NFC payments may process as Debit and cannot be refunded.
- Card issuers/banks may take up to 14 business days to process refunds (returns) to the customer's account.
- Click Save.
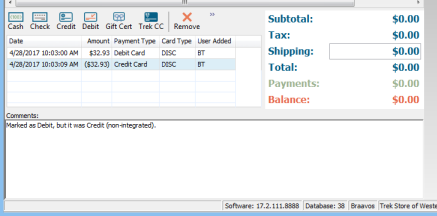
Non-integrated Debit and Credit cards (processed on a separate terminal)
- On your payment terminal, issue the difference (between the current payment and the correct payment).
- Then go to Ascend.
- Open the transaction.
- In the Comments field, explain what happened.
- Make sure the sales item(s) price match what the customer should be charged - you might be adding/removing/replacing an item, adding a discount, etc.
- Select the correct payment type.
- In the Amount field, enter the same amount you just issued to the customer's card on the payment terminal.
- If the person was undercharged, you're adding a positive amount - AKA another payment, such as $15.99.
- If the person was overcharged, you're adding a negative amount - AKA a partial or full refund such as (-$15.99).
- Click Save.
Other payment types (including Cash, Gift Certificates and Chase integrated Credit cards)
- Open the transaction in Ascend.
- In the Comments field, explain what happened.
- Highlight the incorrect payment on the lower part of the window.
- Select the Remove icon.
- If you are voiding a Credit card payment, you will need to swipe the card (or enter the card number) one more time.
- Select Yes to confirm you want to remove the payment.
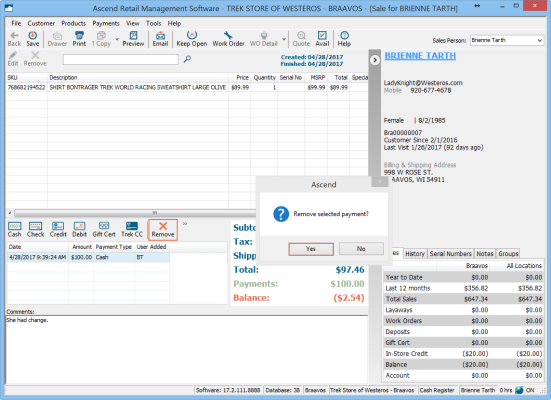
- Now add the correct payment type or payment amount to the sale.
Fixing a payment error at a later date
Ascend offers a wide variety of payment options, which means there are different rules for removing or revising those payments. Find the section below that matches the payment type you are working with.
Fix an incorrect payment type
- Create a new sale in Ascend.
- Select the correct Customer.
- In the Comment field, explain what happened.
- Select the correct payment for the sale from Payment Types.
- Enter the payment amount for the sale in the Amount field.
- Click Save. This should make your balance negative (in parentheses).
- Now, from the Payment Types, select the original payment method (that was incorrect).
- The Amount field should auto-fill with the correct amount (a negative amount). Verify it's correct.
- Click Save.
Fix an incorrect payment amount
If you're changing the payment amount
- Create a new sale in Ascend.
- Select the correct Customer.
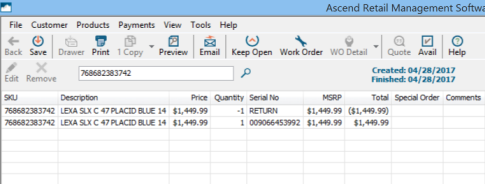
- Add the product(s) from the original transaction.
- To match sure the products exactly match the first sale, select Products menu > Return Previous Sales Items.
- Scan the receipt in the Sales Receipt Number field and click Search.
- Select the correct product(s) and click Add.
- Make sure the item(s) are added with a negative quantity (for example, if you originally sold 2 of the item, it should show -2).
- If it's not negative, double-click the sales item to edit it.
- Change the Quantity to negative the original quantity.
- If applicable, apply a discount (matching the original discount).
- Click Save in the Sales Item window.
- Re-add the products from the original transaction with a positive quantity ("exchanging" the same products ensures your inventory is still accurate).
- If applicable, re-apply the discount.
- In the Comments field, explain what happened.
- Select the correct Payment Type.
- In the Amount field, enter the amount difference between the correct amount and the amount charged (i.e. amount originally charged minus the correct amount).
Note: Debit payments must be refunded (returned) as Credit. NFC payments may process as Debit and cannot be refunded.
Card issuers/banks may take up to 14 business days to process refunds (returns) to the customer's account. - Click Save.
Fixing Serial Number Errors
On the same day
These directions apply whether you sold it with the wrong serial number or not serial number at all!
- Open the transaction.
- Right-click the sales item with the incorrect serial number.
- Click Edit.…
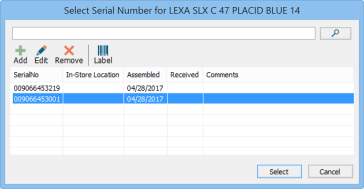
- Select the search icon next to the Serial Number field.

- Double-click the correct serial number (or add a new one, if needed).
- Click Save.
Then you can finish the transaction as normal.
Adding or changing a serial number at a later date
If you need to fix the serial number in a closed sale on a later date, you'll need to do a product exchange.
- Return the bike.
- Create a new sale.
- To match sure the products exactly match the first sale, select Products menu > Return Previous Sales Items.
- Scan the receipt in the Sales Receipt Number field and click Search.
- Select the correct bike and click Add.
- Re-add the bike from the original transaction.
- You should receive a Select Serial Number prompt. Select the correct serial number.
If you do not get a serial number prompt, try double-clicking the product to edit it. Select the Search icon next to the Serial Number field.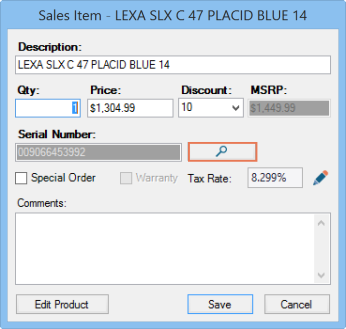
If the Search icon is grayed out and you cannot add a serial number, the product may not be in the correct Product Category. You can go into the product record to assign a category or use the Category Mapper. - Once you've attached the correct serial number to the bike, explain what happened in the Comments field.
- Finish the sale like normal.
Customer Errors
If the sale is still open as a Work Order or Layaway, it's easy to change the customer attached to it. Just open the transaction and select the Customer dropdown menu > Select. Then find and assign the correct customer.
Remember that the customer attached to the transaction page in a Work Order is the one paying for the Work Order. You can have one person attached to the Work Order and a different one attached to the Work Order Detail (aka ticket).
When no customer was assigned
- Create a return for the original sale.
- Make sure the sales items exactly match the original sale.
- Apply any discounts, if needed to match the original sale.
- Refund the sale as Cash.
- Create a new sale for the correct customer.
- Make sure the sales items exactly match the original sale.
- Apply any discounts, if needed to match the original sale.
- Apply the payment as Cash.
- Explain what happened in the Comments field.
When the wrong customer was assigned
- Create a return for the original sale.
- Make sure the sales items exactly match the original sale.
- Apply any discounts, if needed to match the original sale.
- Refund the sale as Cash.
- Create a new sale for the correct customer.
- Make sure the sales items exactly match the original sale.
- Apply any discounts, if needed to match the original sale.
- Apply the payment as Cash.
- Explain what happened in the Comments field.
Note
If you have duplicate customer records for someone, merge them together to maintain all the information, history, and profile balances (in-store credit, gift certificate, etc.).
Product Errors
On the same day
- Open the transaction
- Right-click on the incorrect sales item
- Select Remove.
If you cannot remove the product, you might not have the User permissions that allow you to do that. Ask a manager to help or change your permissions. Once the item is removed, you can proceed with the transaction like normal.
At a later date
If you need to fix product(s) in a closed sale on a later date, you'll need to do a product exchange.
- Create a new Sale.
- Return the incorrect sales item(s). Make sure the item(s) have a negative quantity.
- Sell the correct sales items.
- Take or give payment, depending on the price difference (if there is one).
Additional Resources
KB22-223