
Run a sale in Ascend
- Select the Sale icon on the Ascend desktop.
- A prompt to select a Customer pops up. Use the search bar to find and select your customer. The dropdown menu defaults to Last Name but you can select another option if needed.
- Select OK.
- The transaction screen opens. Start scanning the customer's products into the sale.
Note
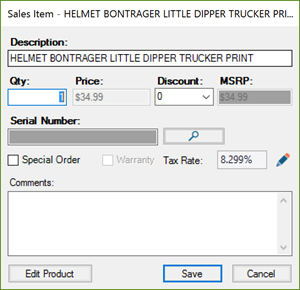
If you are unable to scan an item, or the scan code doesn't pull up the correct item, you can use the product search bar to find the item using it's UPC, SKU, Part Number, Description, etc. If the search brings up multiple items, double-click the one you want to add to the sale. - If you need to edit any of the line items, double-click on them to open the Sale Item Window. Just remember that any changes made to pricing only affect this particular sale.
- Once all products are scanned, verify the Total with the customer.
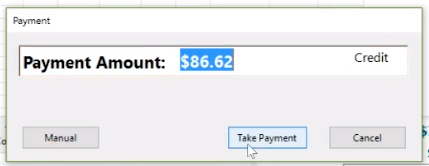
- Select the appropriate Payment Type.
- Verify the Amount with the customer.
- For Credit and Debit card payments, select Take Payment. For everything else, select Save.
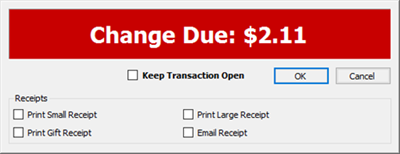
- If the customer paid in full, the Change Due window will open and you can select a receipt option, if needed.
- If the customer did not pay in full, you can Save the transaction. It will be marked as a Layaway and remain open until the full amount is paid.
Out of stock products
If you attempt to add a product to the sale that is out of stock, Ascend will prompt you to order the item.
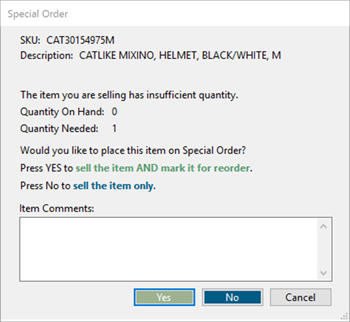
If you’d like to order it, click Yes. Otherwise click No to sell the item without ordering it, or click Cancel to remove it from the transaction.
If you do have the product and Ascend prompts you to order it, your inventory might be off. Notify a manager right away to get that taken care of.
Incorrect payments
Uh oh - was that payment made in error? Whether it was the wrong payment type, wrong amount entered, or something else - Ascend can help.
Note
If you are integrated with Chase and using an Ingenico payment terminal, it does not matter if you select Credit or Debit for the payment type. The device will prompt the customer correctly either way.
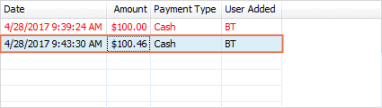
On the day the incorrect payment was made, changes can be made easily. Most of the time, you can simply highlight the payment on the transaction screen, then click Remove. The removed payment will appear in red.
If you need to reverse a Credit card payment, you'll need to have the card information available to void the original payment.
Debit, and NFC payments cannot be voided. But you can create an offsetting payment to give the customer their money back. Simply select Credit, enter a negative amount - it'll display in parentheses, such as (49.99)- and then process the card once more.
Once the incorrect payment is gone, you can see the updated sale Total and take the correct payment.
Receipt options
On the Change Due screen, you might notice a checkbox or two marked by default. These are your receipt Options.
You can override the settings here, on the Change Due screen, by simply checking or unchecking the boxes in the window. Then select OK.
If you want to change your default receipt settings, select the Options icon on the Ascend desktop. Navigate to Receipts > Defaults. Check or uncheck the boxes you want as your default settings.
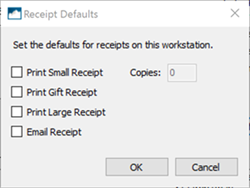
Just remember that these settings are workstations-specific (affecting the computer you are on) and will affect all employees that use that computer.
Return an item
You an easily return an item right from the transaction screen.
- Select the Return icon.

The Previous Sales Item window pops up.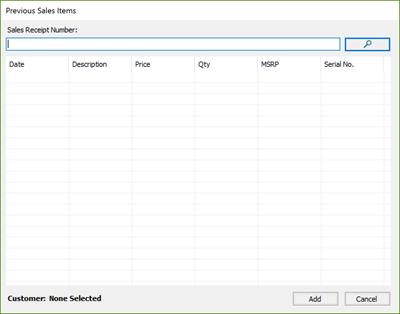
- Scan the sales barcode on the customer's receipt.
- The sales items will appear in the window. Check the items that are being returned.
- Select Add.
- A prompt to give a refund to the original customer appears. Select Yes. If you select No, you will need to attach a different customer to the transaction.
- Once a customer is selected, the return is added to the transaction screen.
Additional Resources
KB22-011