
As part of Trek’s commitment to sustainability, multiple orders may be combined into a single shipment to save on packaging and fuel. It also means you get products on your floor much faster.
Note: This feature requires Trek integration in Vendor Orders and the Vendor Orders user permission (see All about the Ascend User permissions).
Once a packing slip has been used to receive order items, it cannot be used again. Receiving cannot be undone. Verify all order information and items are correct BEFORE receiving any products.
- Before using this tool, be sure to update Trek products (see Using the Cloud Product Catalog), check the B2B Roll over SKU report, and use the Product Replacement Wizard (see Using the Product Replacement Wizard (model rollover tool)) to adjust any order items which were changed to a new model.
- From Database Explorer > Orders, click the Rec. Wizard button (on the toolbar).
OR
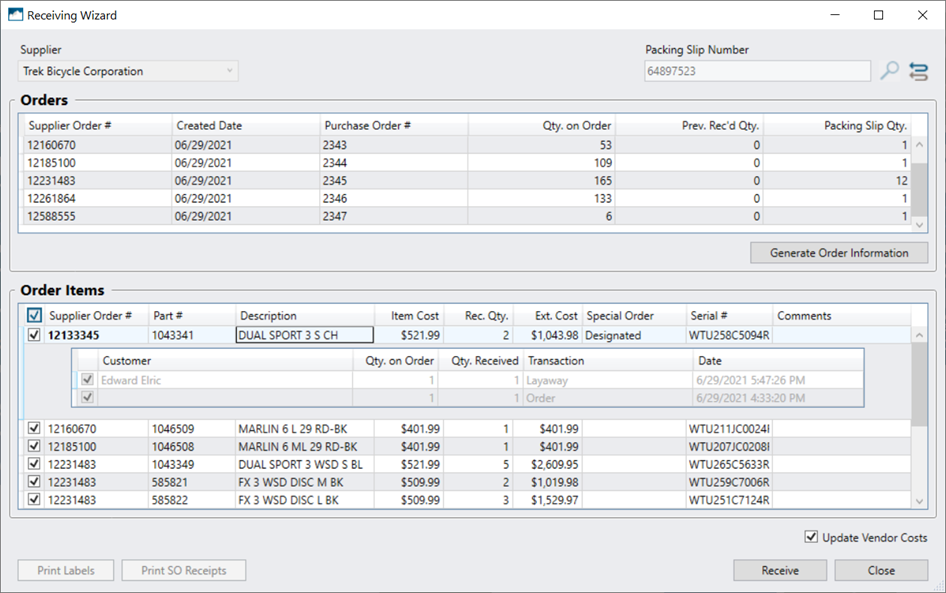
From the Ascend Desktop, select the Integration menu > Trek > Receiving Wizard. - In the Packing Slip Number field, scan or enter the shipment number from the packing slip that came with the shipment.
- Order information is automatically retrieved from your B2B account. When an exact match (including spaces) for the Vendor Order # entered in Ascend exists, the Orders section displays any previous information entered.
- Supplier Order #: Trek’s order number.
- Created Date: The date the Vendor Order was started in Ascend.
- Purchase Order #: The PO Number (usually automatically generated by Ascend) entered for the Vendor Order.
- Qty. on Order: The total quantity of items on the Vendor Order.
- Prev. Rec’d Qty.: The total quantity of items on the Vendor Order which were received prior to this session.
- Packing Slip Qty.: The total quantity of items included in this shipment.
- Click the Generate Order Information button to analyze the order items in your system.
- If the order was not entered in Ascend (e.g. pre-sale orders which must be placed on B2B), order information from B2B automatically populates a new Vendor Order.
Note: Enter all orders in Ascend as soon as they’re submitted with the vendor. This ensures orders aren’t lost and you have an accurate picture of how long it takes to receive an order after it’s placed.
If you believe the order was already entered in Ascend, close the Receiving Wizard and investigate further before receiving any products. Check for extra spaces at the beginning and end of the Vendor Order #. If a new order is created when it already exists in Ascend, the order is duplicated. - If the order exists in Ascend but is missing items from the shipment, the missing items are automatically added to the appropriate Vendor Order.
- If special orders exist for the product but are not tied to an order item, the Special Order(s) Available message displays to alert the user that these order items can be assigned to a customer after receiving. Article: Selling products from existing vendor/supplier backorders
- If the order was not entered in Ascend (e.g. pre-sale orders which must be placed on B2B), order information from B2B automatically populates a new Vendor Order.
- In the Order Items section, all items included in the shipment display and are automatically checked.
- Supplier Order #: The Trek order number which contains the item.
- Part #: The Vendor Part Number (VPN).
- Description: The Vendor Product’s Description.
- Item Cost: The cost for the individual item. If the B2B cost is different from the Vendor Product value, the order item cost is updated accordingly.
- Rec. Qty.: The total quantity for the item included in this shipment.
- Ext. Cost: Item Cost times Rec. Qty.
-
Special Order: If any special orders are associated to the order item, Designated displays.
Note: Click the order item to view details on customers assigned to the items to receive. - Serial #: The serial number(s) for the item sent automatically populates from B2B.
- Comments: Any additional notes entered for the item.
- Check over ALL items to ensure the physical items match the packing slip (e.g. physical quantities/sizes/colors are correct). Uncheck any items which are incorrect and should not be received.
Note: Packing slip numbers cannot be reused once ANY of its order items are received. If you are unsure if an item is correct, close the Receiving Wizard and investigate further before receiving any products. - Check Split Shipping on Items if you wish to apply shipping charges evenly across all order items.
Note: Applying shipping charges to order item costs affects your COGS and Margin. Discuss the handling of freight charges in Ascend with your bookkeeper. (QuickBooks users) If you've assigned an account to Shipping Charges (in Options > QuickBooks), shipping charges cannot be split and this option is not available. - Check Update Vendor Costs if the items’ costs have permanently changed and Vendor Product Costs should be changed.
- Click the Receive button to check the selected items into inventory.
- If products received are missing information, the Missing Product Attributes and/or Category Mapper dialog box(es) display.
- (optional) Click the Print Labels button if you wish to print labels for products.
- Click the Print SO Receipts button to print a copy of the transaction receipt for all special order items received. Attach these to the appropriate item and set aside in your designated area for layaways/special orders.
- Click the Reset button (double arrow icon) if you have additional shipments to receive
- When all shipments are received, click the Close button.
KB22-092