
Let Trek supercharge your marketing online and in-store. Trek Connect Retail Marketing includes segmented email, POP, print catalogs, and participation in all Trek cross-channel promotions and sales.
This program is available from Trek for a separate fee; see the B2B article for full details on this program.
Setup
General preferences
To display your store's logo in emails, send a high-resolution image file of your store's logo to trekconnect@trekbikes.com (if you don't send an image, we'll include a stock shop picture for you).
- 300 dpi.
- Largest size possible.
- Vector-based file formats (.ai or .eps) are preferred so that we can resize as needed without degrading its look.
Then, set up your store profile on Trek's B2B site.
Note: If you're a multi-store retailer, store profiles must be configured separately for each location.
- Select the Services tab.
- In the Trek Services section, click the Edit Store Profile link.
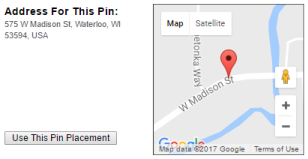
- Enter all address information.
- Click Continue.
- Click Use This Pin Placement next to your desired option.
- In the Dealer Information section, click the Edit (pencil) icon.

- Dealer Name: Enter the name you wish to be displayed to customers for marketing purposes.
- Telephone: Enter your store's primary phone number.
- E-Mail: Enter the email address for customers to contact the store.
-
Web Address: Enter your website address.
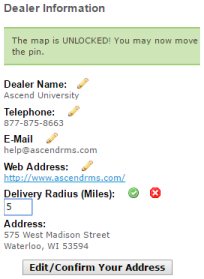
- In the Dealer Information section, click the Edit (pencil) icon.
- Click the Accept (check) icon.

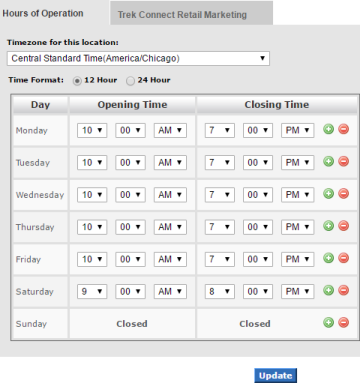
- Select the Hours of Operation tab.
- From the Time zone for this location dropdown, select the appropriate time zone.
- From the Time Format field, select your desired display option.
- 12 Hour: Display times in standard US format (e.g. 10:00 AM, 1:00 PM).
- 24 Hour: Display times in "military" format (e.g. 10:00, 13:00).
- Enter your store hours.
- Select the Trek Connect Retail Marketing tab.
- In the Email Marketing section, enter your preferences:
- Choose to send bi-weekly promotional email campaigns (must change 72 hours before scheduled email send)
- Yes, send campaign emails on my behalf: Participate in Trek Connect Retail Marketing email campaigns. You'll have the option to review and opt out of specific campaign emails.
- No, do not send campaign emails on my behalf: Do not participate in Trek Connect Retail Marketing email campaigns. This option must be selected no more than 72 hours before the scheduled send date for a campaign.
- Trek Connect Retail Marketing Email Address to be used for email proofs: Enter the email address(es) for the store employee(s) responsible for verifying email content or opting out of specific campaign emails.
- Facebook and Twitter URL: Enter your social media profile address(es).
- Post Purchase survey URL: If you assess customers' purchase experiences, enter the address for the survey.
- Choose to send bi-weekly promotional email campaigns (must change 72 hours before scheduled email send)
- (optional) In the Paid Search section, enter your advertising preferences.
- Paid Search Budget: Enter the maximum amount you wish to pay monthly for advertising.
- Paid Search Zip Codes: Enter zip codes for the area to which you wish to advertise.
- Find my local bike shop ad: Enter the URL for your advertisement.
- PPC URL: For each category to advertise, enter the address for the category page on your website.
- Coupon options: For each campaign, choose the coupon amount you wish to offer customers.
- Click Update.

Ascend settings
- Keep Ascend on the latest version.
- Keep Trek vendor products up to date.
- Ensure all products in stock are properly categorized.
Note: Categorize products at the time they are received – check Options > Ordering > Check for missing product attributes. - Assign a customer to every transaction.
- Verify all customer information is entered and correct.
- Verify Options > General > Allow Data Transporting is checked.
- Register all bikes sold with Trek.
Coupon setup
Transactional email coupons do not change from year to year - so set them up as soon as you sign up for Trek Connect Retail Marketing and you'll be ready to go as soon as your first email goes out!
Note: Use a Symbol/Motorola/Zebra DS4308-DL, DS6878-DL, or DS8178-DL barcode scanner to scan the coupon directly from a customer's smartphone screen!
In order to give you accurate comparison reports, Trek Connect Retail Marketing catalog coupons change with every catalog. Set up all coupons prior to the start of the campaign to ensure you're ready as soon as it starts.
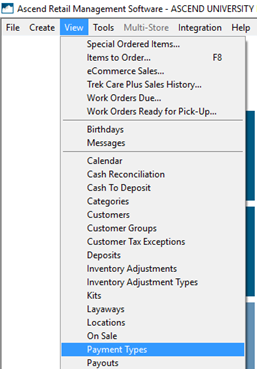
To begin, select the View menu (from the Ascend Desktop) > Payment Types.
Then, click Coupon in the upper pane to display all coupons configured in your system.

On the lower toolbar, click Download.
Note: If you're a multi-store retailer, coupons automatically share between all locations, so you only need to do this at one location.
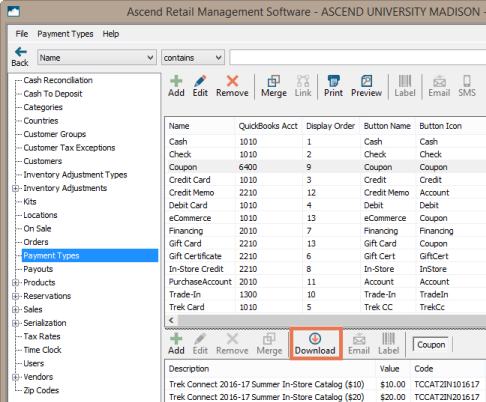
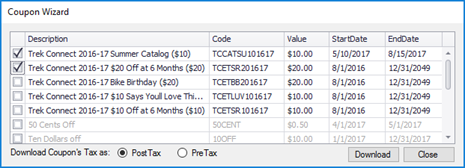
Check the Trek Connect Retail Marketing coupons you will be using, choose the appropriate tax option according to your local tax laws, and click Download (see Download coupons using the Coupon Wizard for more details).
Note: Always check your local and state tax laws before overriding tax rates. You may be liable for paying sales tax even if you did not collect it from the customer(s).
- Pre-Tax: Coupon value is deducted before tax is calculated.
- Post-Tax: Coupon value is deducted after tax is calculated.
Using coupons
First, make sure you've configured all coupons in your system.
Start a transaction and scan in the customer's products as normal. Before you take any other payments, click Coupon on the Payments toolbar.
Make sure your cursor remains in the Code field, then simply scan the barcode on the coupon.
Note: Use the Symbol DS4308-DL, DS6878-DL, or DS8178-DL to scan coupons from a customer's smartphone screen.
Can't scan the barcode? Select the appropriate coupon from the Description dropdown. Amount is automatically entered. Coupons can only be used once, and have no cash value. Encourage the customer to redeem the full amount. If the transaction total is less that the coupon amount, the coupon payment is automatically adjusted. If desired, enter additional notes in Comments. Once you're all set, click Save and complete the transaction as normal.

Campaign performance
Log in to Trek B2B, then select Services. In the Trek Services section, click Dealer Scorecards and Reports.
In the Trek Connect Retail Marketing Report section, click Generate Report. The TCRM Marketing Metrics report downloads in PDF format.
KB22-209