
How do I configure my Windows® settings for Ascend?
Windows® settings must be configured separately on each computer running Ascend. To get started, open up your computer’s Control Panel: just click on the Start menu and start typing to search.
Windows® Updates
Complete all required Windows® updates before installing Ascend. The Ascend Installer may not complete if Windows® is not up-to-date.
Windows® updates may not be cumulative. Additional updates may be required after another is installed.
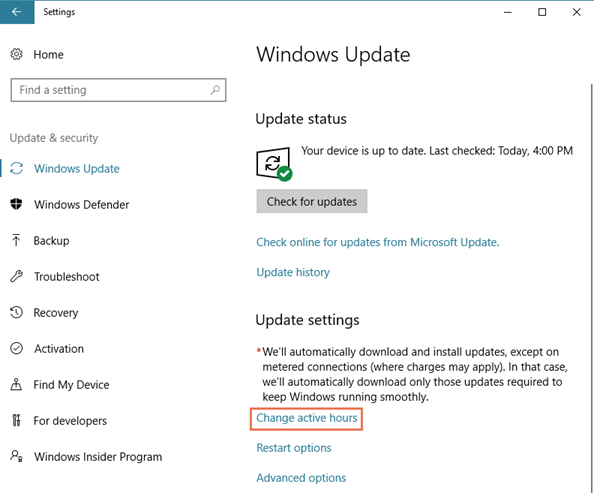
- Click the Start menu, click Settings (gear icon), click Update & Security, then click Change active hours.
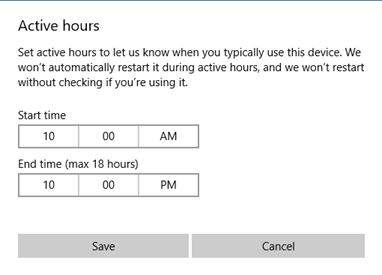
- Select the hours when employees will be in the store and working in Ascend (maximum 18 hours) and click Save.
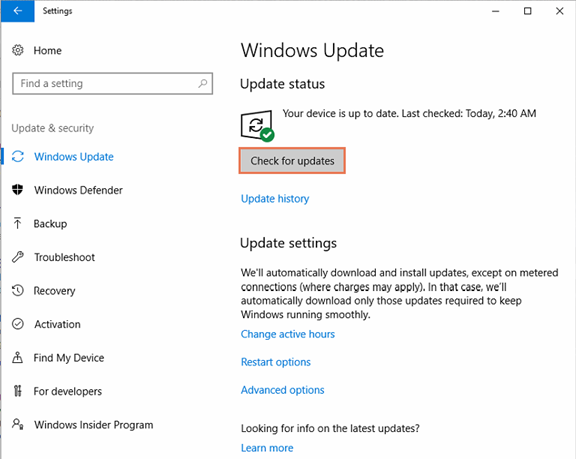
- From the Windows Update screen, click Check for updates.
- Click Install Updates and restart as prompted.
- Repeat the process until no more updates are available.
Power & Display
- Click Hardware and Sound, then click Power Options.
- In the Plans section, select High Performance.
- Click Change plan settings.
- From the Put the computer to sleep drop-down(s), select Never.
- Click Change advanced power settings.
- Expand Hard Disk, then expand Turn Off Hard Disk After.
- Set all options to zero minutes and click Apply.
- Expand Sleep, then expand Sleep After.
- Set all options to zero minutes and click Apply.
- Expand USB settings, then expand USB selective suspend setting.
- From the Setting drop-down, select Disabled and click OK.
- Click Save Changes.
Windows® Firewall
- Click System and Security, click Windows Firewall, then click Turn Windows Firewall on or off.
- Under all Network Location Settings sections:
- Select Turn on Windows Firewall.
- Disable Block all incoming connections.
- Enable Notify me when Windows Firewall blocks a new program.
- Click OK.
- Click Allow an app or feature through Windows Firewall.
- In the Allowed Apps and Features list, verify File and Printer Sharing is enabled in the Home/Network (Private) column and click OK.
Network
- Verify your network connection.
- Right-click Start and select System.
- Under the Computer name, domain, and workgroup settings section, verify the value in the Workgroup field matches exactly on all computers. If not:
- Click Change Settings.
- (optional) In the Computer Description field, enter a meaningful name for the computer (e.g. Front Register) and click Change.
- In the Workgroup field, enter the required name.
- Click OK on all prompts, then Close. Restart as prompted.
- Click the Start menu, type cmd, and open the Command Prompt program.
- Type ping <server computer name> (e.g. ping SERVER01) and press Enter. Note: To find the name of the computer, right-click the Start menu and choose System.
- If the computer is communicating with the network, a reply displays (e.g. Reply from 192.168.2.30).
- If the machine is not communicating with the network, an error message displays (e.g. Ping request could not find host SERVER01).
- If all cables are connected properly and the computer is still not able to connect to the network, contact a network or IT specialist in your area.
- Configure sharing settings.
- From the Control Panel, click Network and Internet, click Network and Sharing Center, then click Change advanced sharing settings.
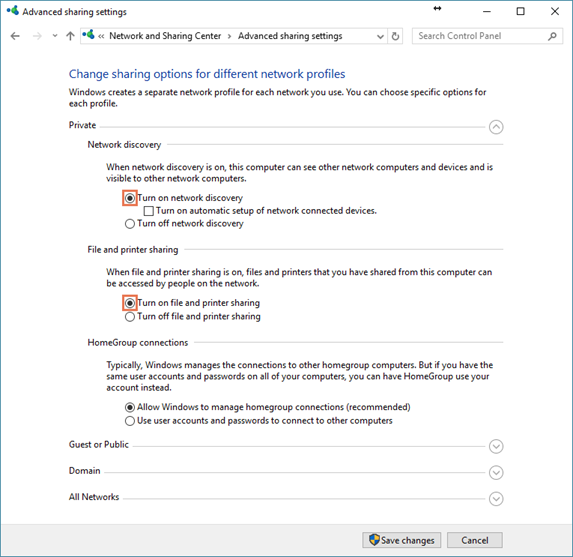
- Expand Private and select the following:
- Turn on network discovery
- Turn on file and printer sharing
-
Allow Windows to manage homegroup connections (recommended)
- Expand All Networks and select Turn off password protected sharing.
- Click Save changes.
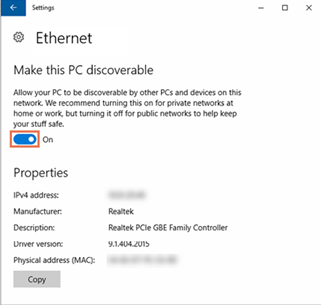
- (Windows® 10) Click the Start menu, click Settings (gear icon), then click Network & Internet.
- (Windows® 10) In the left pane, click Ethernet.
- (Windows® 10) In the right pane, click Ethernet again.
- (Windows® 10) Enable Make this PC discoverable.
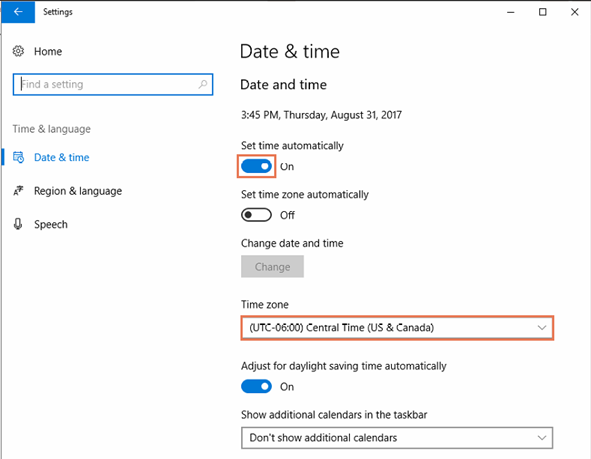
Prevent System Time Changes
- Click the Start menu, click Settings (gear icon), then click Time & language.
- From the Time zone drop-down, select your time zone.
- Enable Set time automatically.
Internet Options
Google Chrome
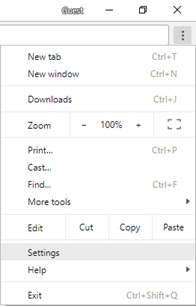
- Open Google Chrome and navigate to Settings
- Select the Customize and control Google Chrome (dots icon) menu > Settings.
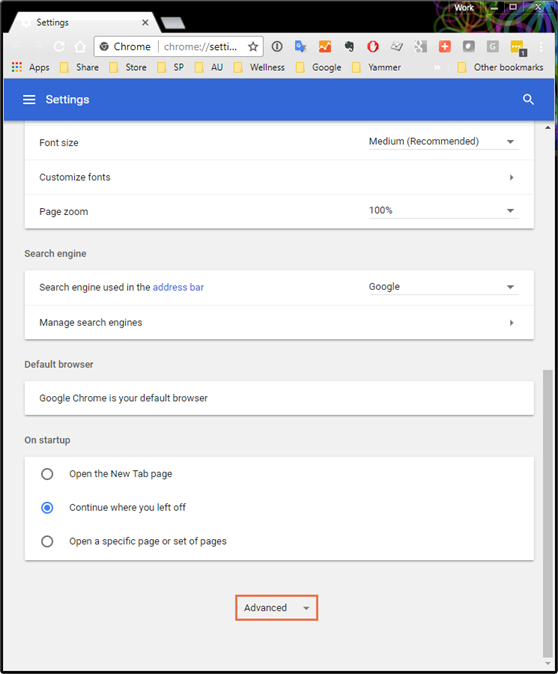
- Click Advanced
- Select the Customize and control Google Chrome (dots icon) menu > Settings.
- Allow cookies from the Ascend website
- In the Privacy and security section, click Content Settings
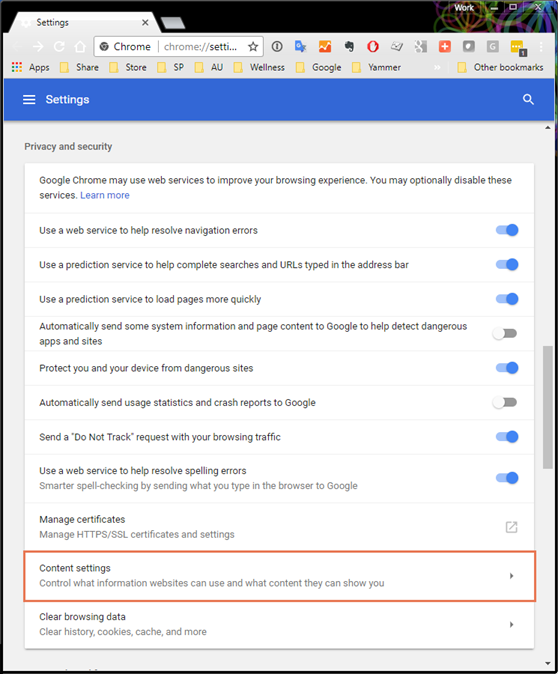
- Click Cookies.
- In the Allow section, click Add.
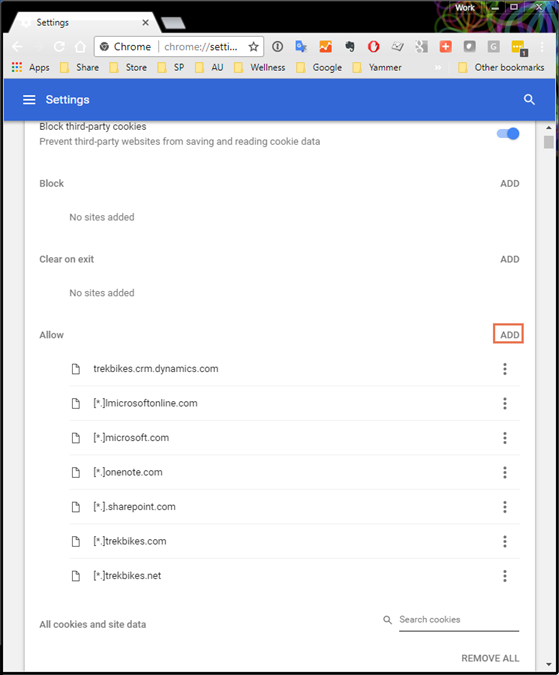
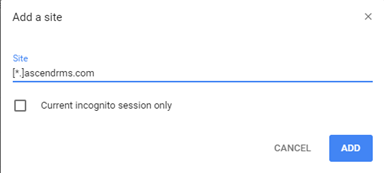
- In the Site field, enter [*.]ascendrms.com, then click Add.
- In the Privacy and security section, click Content Settings
- Allow pop-ups from the Ascend website
- In the Content Settings section, click Popups.
- In the Allow section, click Add.
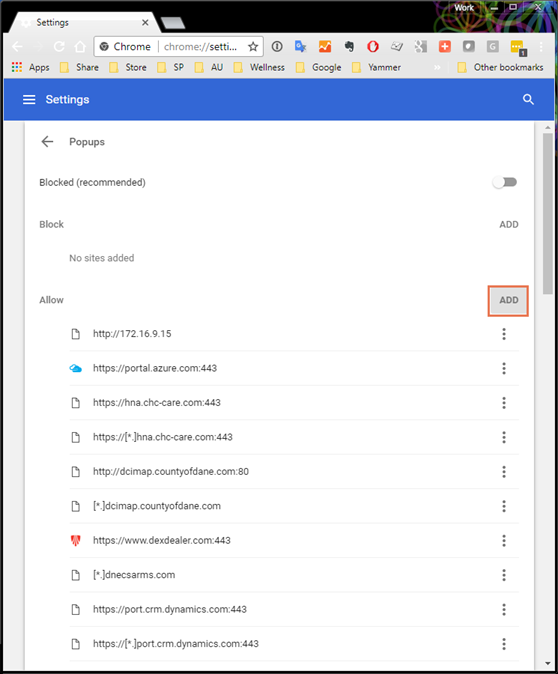
- In the Site field, enter [*.]ascendrms.com, then click Add.

Firefox
- Open Firefox and navigate to the Settings via the three lines button the top right:
- Allow cookies from the Ascend website
- Select Privacy and Security on the left
- Choose Manage Exceptions under Cookies and Site Data
- Enter [*.]ascendrms.com into the Address of website field
- Click Allow
- Click Save Changes

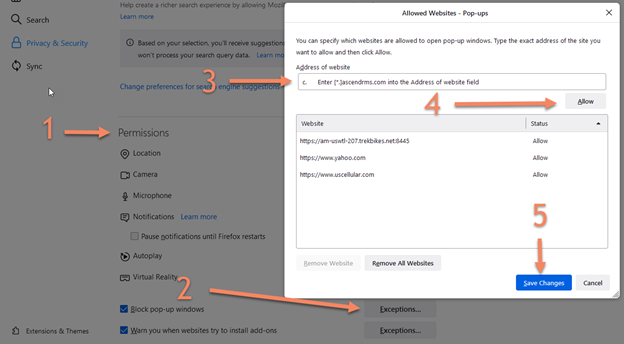
- Allow pop-ups from the Ascend website
- Scroll down from the Cookies and Site Data until you reach Permissions
- Next to the Block pop-up windows option, click Exceptions.
- Enter [*.]ascendrms.com into the Address of website field
- Click Allow
- Click Save Changes
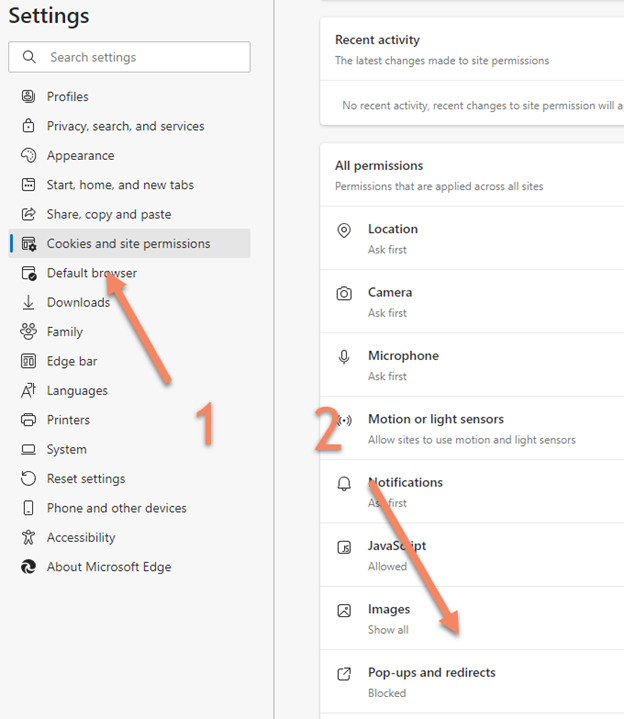
Edge
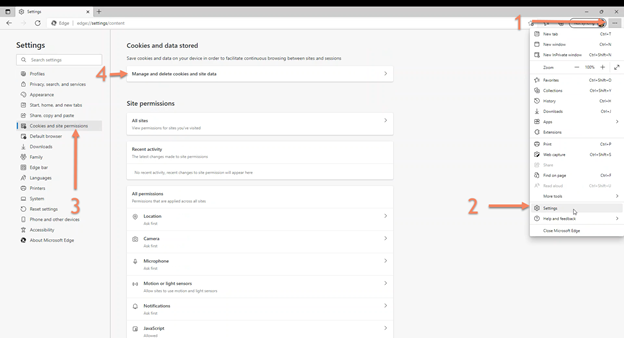
- Open Microsoft Edge and navigate to Settings via the ellipsis (…) on the top right
- Allow cookies from the Ascend Website
- Select the Cookies and site permissions menu on the left.
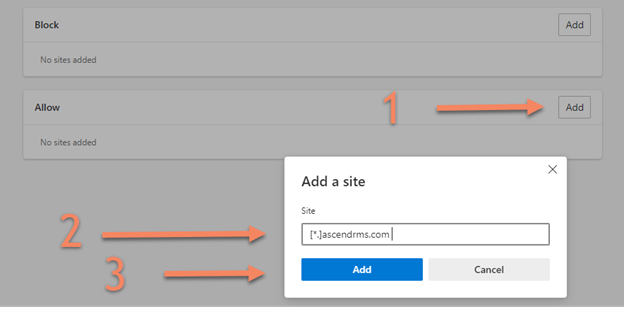
- Click Manage and delete cookies and site data
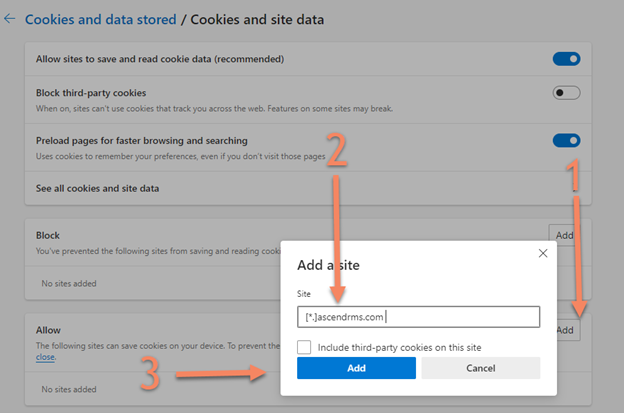
- Click the Add button located to the left of Allow
- Enter [*.]ascendrms.com into the Site field
- Click Add
- Allow pop-ups from the Ascend website
- Navigate back to Cookies and permissions by clicking the tab on the left
- Scroll down until you see Pop-ups and redirects
- Click the Add button located to the left of Allow
- Enter [*.]ascendrms.com into the Site field
- Click Add
Devices & Printers
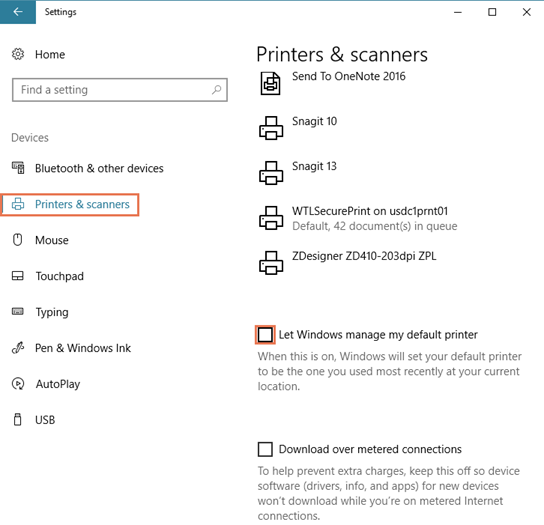
Windows 10
- Click the Start menu, click Settings (gear icon), click Devices, then click Printers & Scanners.
- Uncheck Let Windows manage my default printer.
KB22-081