

If you are new to creating orders or want review best practices, check out our article Best Practices - Ordering & Receiving and Ordering - Walk through the Vendor Order (purchase order) Screen.
Permissions Needed:
- Database Explorer: Ability to access the Database Explorer screen (keyboard F4).
- Products / Vendor Products - Add/Edit Master Data: Ability to manage information in the Master Data section of the Product Editor, which is shared between all store locations (e.g. Description, UPC, SKU, Category, Brand) and adding products from within the Cloud Catalog.
- Vendor Orders: Ability to manage vendor orders (purchase orders).
Quick Steps to Create an Order
- Click the Place Order tile on the Ascend desktop.
- Select the Vendor you would like to create an order for from the Select Vendor prompt.
- Add items to the order through the Reorder/Items to Order (special order items) or Individually.
-
Verify:
- Special Orders
- Quantities being ordered
- Cost
- MSRP
- Case Qty
- Add PO Number (if not auto populated).
- Add Vendor Order #.
- Update Order Status to Submitted.
- Enter Date Submitted.
- Click Save.
- Assign products to Category if prompted by Category Mapper.
- Wait for order to arrive to receive.
Note: If you are submitting an order for an integration vendor (e.g.: Trek or QBP) at step 7 you will click submit and the Order Status and Date Submitted will be auto populated.
How to Access Vendor Orders
- Select:
- The Place Order tile on the Ascend desktop
- Create > Vendor Order from the Ascend desktop
- Or the Add icon on the Orders window in Database Explorer


- From the Select Vendor prompt, find and highlight the Vendor you'd like to create an order for.
- Double-Click on the Vendor name or Select in the right-hand corner.
There are three ways to add products to the order: add products individually, using the Items to Order list, or importing a purchase order from Excel.
Add Items to a Vendor Order
Add Reorder Items (min/max) and/or Special Order Items
Best practice is to begin by adding item(s) from the Items to Order screen. This will display any Reorder Items (based on min/max settings) and Special Order item(s). For more information on using Items to Order, check out or article: Ordering - Reorder and Special Order Items.
- From within the vendor order, select Reorder in the toolbar or View > Items to Order.

- Check the box next to each of the items you'd like to add to the order from the Items to Order prompt.

- Click Add to Order.

- The items selected are added to the order.
- Note: You have the ability to modify the quantities of items if needed.
Note: You may also use the Ascend HQ - Special Orders Management Tool.
Add Products to the Order Individually
- From within the Vendor Order, use the search bar to find and add products individually to the order.

- After each item is selected, you'll be prompted for the quantity you are ordering.
- Enter the quantity to order.
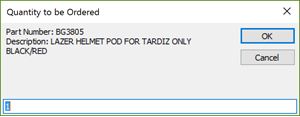
- Click Ok to add the item to the order.
Note: You can turn off the prompt for quantity when ordering by going into Options > Ordering > Prompt for Quantity when Ordering. Some people prefer to have the prompt turned off and use In-Cell editing to modify the Order Qty.
Using the Cloud Catalog from within the Order screen
Sometimes, you might encounter a product you want to order that isn't in your database or isn't linked to the vendor you're creating the order for. In such cases, you can use the Cloud Catalog within the purchase order screen to search for and add the product to your database.
Check out our article: Products - Using the Cloud Product Catalog for more details.
Importing Products into a Vendor Order
If you are ordering from a Vendor that has the order available for download in an Excel file, you can format that file for import into a Vendor Order.
Check out our article: Ordering - Importing Products into a Vendor Order (purchase order) for more details.
Verify Product Information
Cost and Case Qty Products
Often when creating orders you have more time to take care of Cost updates and checking that any Case Qty products are setup correctly in the order.
Cost: Turning on In-Cell editing helps you to quickly make Cost updates in your purchase order screen. This helps the person receiving the order to save time from having to make those cost updates and instead do a verification that costs match the pack slip and begin their receiving process.

Case Qty Products: To ensure bulk items are received correctly (correct quantity on hand and average cost) take time to verify that Case Qty products are setup correctly at time of order creation. If we were to receive the product example below, it would put 1 as our quantity on hand with the item cost of the case.
To set a Case Qty:
- Double click on the product. From the Edit Order Item prompt click Edit Vendor Product

2. From Edit Vendor Product set the Case Qty, Case MSRP, and Case UPC.

- Case Qty: Update to match the number of individual items that come in the case/bag/box.
- Case MSRP: We recommend filling in the Case MSRP field. Even though that information is in the vendor product, Ascend will fill in the correct MSRP if you scan the full box into a sales transaction. For example a customer wants to by a whole box of GU gels.
- Case UPC: This only needs to be filled in if the Case UPC and the Product UPC are different (nutrition, CO2 cartridges and patches kits are some examples where the Case UPC and Product UPCs are different). Spokes is an example of a product does not have a different Product and Case UPC so you would leave Case UPC blank.
Enter PO Number and Vendor Order #
Best Practice is adding the PO and Vendor Order numbers to assist with order and invoice tracking.
Ascend will automatically assign a PO Number if that is set in Options (Options > Ordering > Sequentially Number POs, check to turn on). If there is a PO Number assigned by the vendor or you created a custom one for the order you can enter that here.
Enter the Vendor Order # with the order number assigned by the vendor.

Update Order Status
Update the Order Status to how the order was submitted. This is helpful for customer special order, receiving, managing backorder, and invoice tracking.
- Click the Order Status dropdown to change the order status once it's been submitted.
- Select the appropriate Order Status. This Order Status will be applied when the order is saved.

Note: Submitted (Online) cannot be manually selected. It is automatically set for Trek and QBP orders submitted through Ascend.
Submitting Trek or QBP Vendor Orders
For more information about submitting a Trek Vendor Order, check out our article: Ordering - Trek integration in Vendor Orders (purchase orders).
For more information about submitted a QBP Vendor Order, check out our article: Ordering - Quality Bicycle Products (QBP) Integration.
Enter Date Submitted
Enter the date the order was submitted. This is helpful for receiving, managing backorder, and invoice tracking.

Note
If you are creating an order for an integrated vendor (e.g.: Trek or QBP) the following will automatically be filled in when the order is submitted:
- Order Status
- Date Submitted
- PO Number
- Vendor Order #
Save the Submitted Order
Click Save in the toolbar of the order once you have completed it.

Categorizing Products with the Category Mapper
When you save an order (regardless of submission status) you will receive the Category Mapper prompt to categorize any products that have not been previously categorized.
Best Practice is categorizing at time of order creation to save time at the time the order is received.
For more information about using the Category Mapper, check out our article: Products - Category Mapper.

Accessing Open / Active Orders in Database Explorer
For more information on accessing open/active orders, check out our article: Ordering - Accessing Open / Active Vendor Orders (purchase order).
Additional Resources
KB22-014