
Supported Devices
Ascend supports the Zebra® ZD411™ and Zebra® ZD410™ devices. If you have additional questions about support devices and hardware requirements, check out our article, Hardware - Requirements.
Ascend's integration with Zebra® label printers makes it easy for you to print barcode labels for serial numbers and pricing in your shop.
The Zebra® ZD411™ (USB and Ethernet models) and Zebra® ZD410™ (USB and Ethernet models) are supported by Ascend. Other models may work, but are not supported by the Ascend Support team.
Connect the label printer
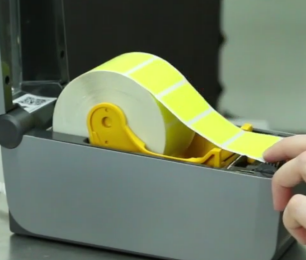
- Put the roll of labels in the printer so the labels face up.
- Connect the printer to the correct port:
- For USB models, connect the USB cable to a port on the back of the computer.
- For Ethernet models, connect to a port on your router or switch.
- Connect the printer to a power source.
- Turn on the printer.
- Go to Devices and Printers on your computer.
- If your printer is available in Devices and Printers, you’re all set! The printer should display as ZDesigner ZD411-203dpi (ZPL).
Once the printer is installed, you can configure your label printer and set it up in Ascend. Scroll to Configure the label printer to proceed.
If your printer is connected with an Ethernet cord, you need to set up the printer's connectivity first. Scroll to Set up the Ethernet connectivity to proceed.
If the printer does not show in Devices and Printers, you’ll need to manually install it before configuring it or going to Ascend. Go to Manually install a USB printer or Manually install an Ethernet printer.
Manually install a USB printer
If your printer did not automatically install when you connected it to the computer, you need to manually install the printer driver.
- Download the Zebra ZD411 Label Printer driver (log into www.ascendrms.com).
- Go to the downloaded file, right-click it, and select Run as Administrator.
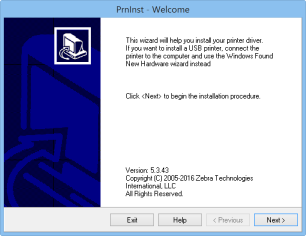
- The Zebra Setup Utilities Welcome opens. Select Next.
- The Zebra Setup Utilities: License Agreement opens. Make sure to check the I accept the terms... box. Then select Next.
- Click Next on the Select Destination window to accept the default location.
- Under Install this application for, verify that Anyone who uses this computer is checked.
- Then select Next on the Select Program Folder window to accept the default location.
- Select Next to complete the installation of the Zebra setup Utilities.
- On the Important Information window, read the notification. Then check the box for I have read the information above and select Next.
- Check the box for Run Zebra Setup Utilities now and select Finish.
-
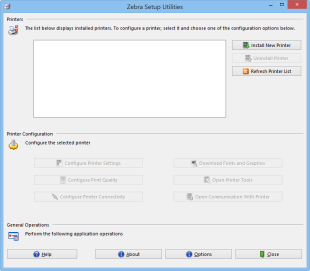
Zebra Setup Utilities opens.

- Select Install New Printer.
- The Welcome window for the printer installation opens.
- Click Next on the Welcome window.
- In Installation Options, click Install Printer.
- Under Manufacturers, select ZDesigner.
- Under Printers, select ZDesigner ZD411-203dpi (ZPL).
- Then click Next to go to Printer Options.
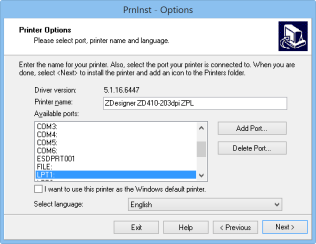
- Accept the default printer name.
- In Available Ports, select USB001.
- Click Next.
- Uncheck both checkboxes in Additional Install Options.
- Select Finish.
Now you're ready to configure your label printer. Scroll to Configure the label printer to proceed.
Manually install an Ethernet printer
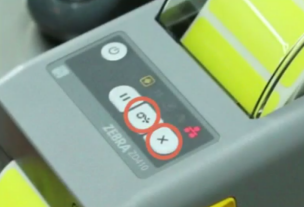
- Press the Feed and Cancel buttons on the printer at the same time. Hold them for three seconds.
- The Network Configuration details will print. Note the IP Address on the second label that printed.
- Download the Zebra® Driver, available under Downloads on the Retailer Portal at AscendRMS.com.
- Go to the downloaded file, right-click it, and select Run as Administrator.
- The Zebra Setup Utilities Welcome opens. Select Next.
- The Zebra Setup Utilities: License Agreement opens. Make sure to check the I accept the terms... box. Then select Next.
- Click Next on the Select Destination window to accept the default location.
- Under Install this application for, verify that Anyone who uses this computer is checked.
- Then select Next on the Select Program Folder window to accept the default location.
- Select Next to complete the installation of the Zebra setup Utilities.
- On the Important Information window, read the notification. Then check the box for I have read the information above and select Next.
- Check the box for Run Zebra Setup Utilities now and select Finish.
-
Zebra Setup Utilities opens.
- Select Install New Printer.
- The Welcome window for the printer installation opens.

- Click Next on the Welcome window.
- In Installation Options, click Install Printer.
- Under Manufacturers, select ZDesigner.
- Under Printers, select ZDesigner ZD411-203dpi (ZPL).
- Then click Next to go to the Printer Options window.
We're going to quickly step away from the printer setup to configure the Ethernet connectivity for it.
- Open a web browser on your computer (such as Google Chrome, Internet Explorer, Safari, or Firefox).
- In the URL address, type the IP Address from the second label in the Network Configuration printout. You need to type it without the first zeros in each section. For example, if my IP Address is 010.020.030.040, I would type in: 10.20.30.40.
- Then select Enter on your keyboard.
- This takes you to the Zebra Technologies webpage.
- Select View and Modify Printer Settings.
- You receive a password prompt; type 1234 into the box and select Submit Changes.
- You'll receive a notification that says: Access Granted. This IP address now has admin access to the restricted printer pages. Please Click here to proceed.
- Click the text to proceed.
- Select Network Configuration on the View and Modify Printer settings page.
- Click TCP/IP Settings.
- In the IP PROTOCOL field (the second from the top), select PERMANENT from the dropdown menu.
- Then click Submit Changes.
- These changes are only temporary right now; select View and Modify Printer Settings to change that.
- Click the Save Current Configuration button to make the changes permanent.
- You can close the browser window.
Now we'll go back to the printer installation window. Navigate back to the Printer Options window.
- Accept the default printer name.
- Select Add Port.
- In the Name field, enter the IP Address from the Network Configuration printout.
- In the Printer Name or IP Address field, enter the IP Address from the Network Configuration printout.

- Click OK.
- In Available Ports, verify LAN [IP Address] is selected.
- Click Next.
- Uncheck both checkboxes in Additional install Options.
- Select Finish to install the printer.
Now you're ready to configure your label printer's setting. Scroll to Configure the label printer to proceed.
Set up the Ethernet connectivity (if your printer installed automatically)
If your Ethernet printer installed automatically, you still need to setup the Ethernet connectivity settings. If you manually installed your Ethernet printer, you have already configured the Ethernet connectivity, and can jump to Configure the label printer.
- Open a web browser on your computer (such as Google Chrome, Internet Explorer, Safari, or Firefox).
- In the URL address, type the IP Address from the second label in the Network Configuration printout. You need to type it without the first zeros in each section. For example, if my IP Address is 010.020.030.040, I would type in: 10.20.30.40.
- Then select Enter on your keyboard.
- This takes you to the Zebra Technologies webpage.
- Select View and Modify Printer Settings.
- You receive a password prompt; type 1234 into the box and select Submit Changes.
- You'll receive a notification that says: Access Granted. This IP address now has admin access to the restricted printer pages. Please Click here to proceed.
- Click the text to proceed.
- Select Network Configuration on the View and Modify Printer settings page.
- Click TCP/IP Settings.
- In the IP PROTOCOL field (the second from the top), select PERMANENT from the dropdown menu.
- Then click Submit Changes.
- These changes are only temporary right now; select View and Modify Printer Settings to change that.
- Click the Save Current Configuration button to make the changes permanent.
Configure the label printer
- Go to Devices and Printers on your computer.
- Right-click the label printer and select Printer Properties.
- Go to the Advanced tab and set the Print directly from printer option.
- Click Apply.
- Click the Printing Defaults icon.
- Go to the Options tab.
- Set Darkness to 15.
- Set Paper Format to Inch and Portrait.
- Set Width to 2.30in (58mm).
- Set Height to 1.00in (25mm).
- Click Apply.
- Go to the Advanced Setup tab and click Calibrate. Several labels will print out.
- Click OK to go back to the Printer Properties box. Click OK again.
Set up the printer in Ascend
- In the Ascend desktop, click the Options icon.
- Select Labels on the left.
- Select your label printer from the Printer Driver dropdown menu.
- If needed, select Portrait from the Orientation dropdown menu.
- Set these margins (but you can tweak them to fit your needs!):
- Left and Right: 0.15
- Top and Bottom: 0.00
- If needed, select Style 3 from the Label Style dropdown menu.
- And select Code128 from the Barcode Type dropdown, if needed.
- Then click Apply.
- Click the Print Sample Barcode icon.
And your label printer is good to go. If the text is slightly askew, you can tweak the margins to help center it.
FAQs & Troubleshooting
Hardware
Q: What printers are compatible with Ascend?
A: Only the Zebra® ZD411™ (USB and Ethernet models) and Zebra® ZD410™ (USB and Ethernet models) are compatible with Ascend. Other models may work, but are not supported by the Ascend Support team. Check out our minimum hardware requirements: Hardware - Requirements
Q: Why do I need to connect my USB cord to a port on the back of my computer/PC/workstation?
A: Other ports (on the front) of the computer may not receive as much power, so they may not be able to support a printer.
Q: How do I determine if my printer driver needs to be installed manually?
A: After hooking your printer to the computer (or router) and a power source, open Printers and Scanners on your computer. If your printer displays, you'll all set! If it does not display, you will need to manually install it.
Computer
Q: Where can I find Printers and Scanners?
A: Right-click on the Windows Logo menu for your computer and start typing Printers and Scanners. This will open up to the available Printers and Scanners.
![]()
Errors
Q: What if I get an error right away when I try to run the Zebra driver?
A: Exit the driver, and then reopen it. But make sure to right-click the file and select Run as Administrator.
Q: What if I get the error "Driver is locked by another process" for the thunking spooler?
A: The installation system needs to restart your spooler, and will stop any items currently printing from this computer. Make sure no other printers are being used by the computer right now. Then select Next. Your computer will probably ask to restart once you are done installing the label printer. Make sure anything important is saved so the computer can restart without causing any problems.
Additional Resources
KB22-085