
Supported Devices
Ascend supports the Epson TM-T88V, VI, and VII devices. If you have additional questions about support devices and hardware requirements, check out our article, Hardware - Requirements.
Before You Begin
-
Make sure you've downloaded the proper driver. If you acquired the driver from somewhere else (even the disc that came in the box), we cannot guarantee it will work. So, before you waste a bunch of your time, just download the correct driver for your model (log into https://ascendrms.sharefile.com/):
- Epson TM-T88V driver
- Epson TM-T88VI driver
- Epson TM-T88VII driver
- Uninstall any older Epson drivers. If you've ever had an Epson receipt printer installed on the computer - no matter how long ago or how old the model - you'll need to make sure everything's been cleaned up. Newer drivers may not be able to simply run an update.
Connect Your Hardware
- Connect the black power cord from the back of the printer (circular with prongs inside) and plug the other end into the wall.
- Make sure the Power Switch in the front of the printer is in the off position. That means it is toggled so the the end with the dot is not pressed down.
- Plug in the appropriate connection type(s).
- For a direct connection to a single computer in the shop, plug the USB cable's square end into the back of the printer, and the other flat and rectangular end into the back of the computer.
Note: While other USB ports on your computer (e.g. front or monitor ports) may work, they don't receive a consistent connection, which may cause your printer to stop working or only work sporadically. - For a printer that will be shared among multiple computers in the shop over the network, plug one end of a CAT-5 cable into the back of the printer and the other into your network router or switch.
Note: While a printer can be connected via USB and shared across the network using Windows®, updates to Windows® can change settings and make this connection unreliable. If you'll be sharing a receipt printer between multiple computers, we recommend upgrading to the Ethernet-capable Epson TM-T88VI ("Epson 6") or Epson TM-T88VII ("Epson 7") model. - If this workstation also has a cash drawer, hook that up. The end that looks like an old school phone cable (smaller connector) goes into the back of the printer. The end that looks like an Ethernet cable (larger connector) goes into the bottom of the cash drawer.
Note: Don't share cash drawers between multiple computers. While it can be accomplished by using a printer shared across the network, this setup makes your cash reconciliation process less reliable, makes cash discrepancies impossible to investigate, and prevents accurate reporting.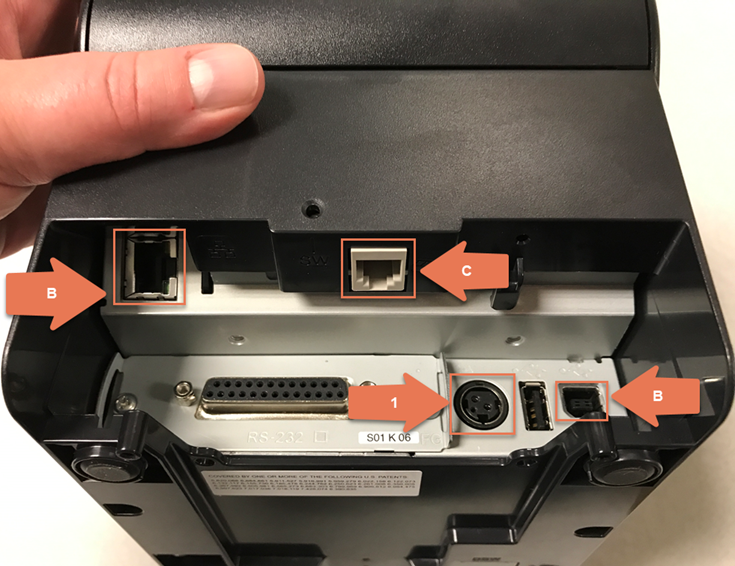
- For a direct connection to a single computer in the shop, plug the USB cable's square end into the back of the printer, and the other flat and rectangular end into the back of the computer.
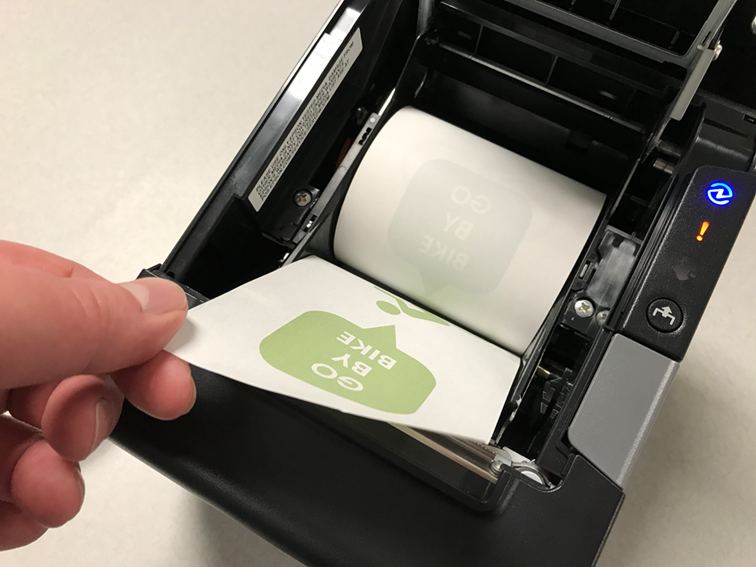
- Put in a roll of paper. The paper must feed from under the roll, with the less shiny side of the paper facing the back of the printer.
- Turn the printer on.
- If the printer is connected to a single computer in the shop, simply push the dot side of the switch down.
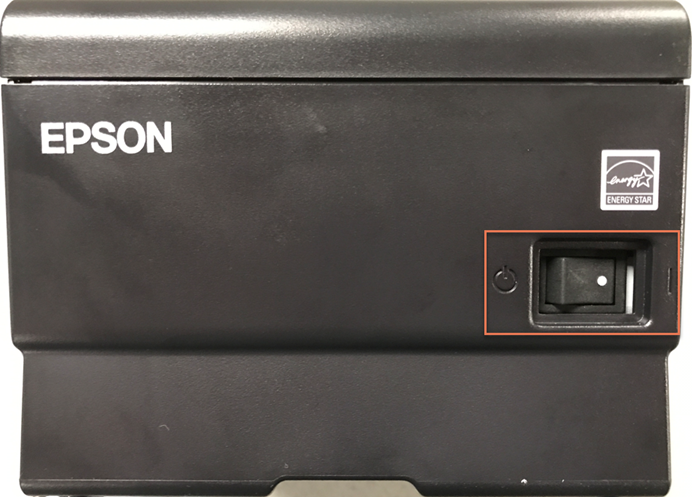
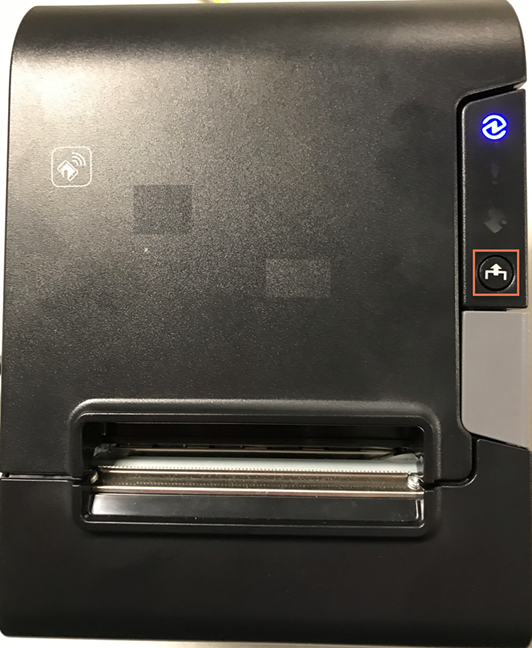
- If the printer is connected to the network, hold down the feed (circle) button and then turn the printer on (above). A configuration page prints - keep this slip handy for the entire setup process.
- If the printer is connected to a single computer in the shop, simply push the dot side of the switch down.
Install the Printer Driver
-
Run the Epson TM-T88 Driver installer you downloaded above.
If you can't find it, check your Downloads folder. - At the Check Installation prompt, click Next.
- At the License Agreement prompt, choose Agree and click Install.
- At the Printer Registration prompt click Next.
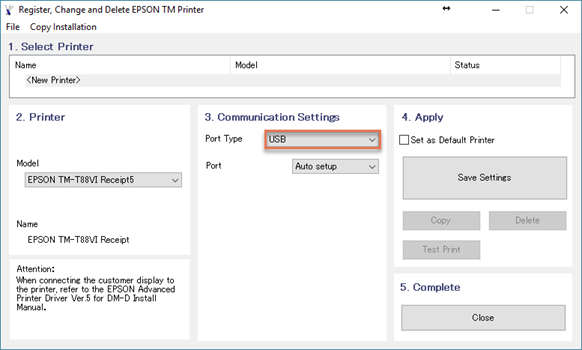
- At the Register, Change and Delete Epson TM Printer prompt:
- Select the appropriate Port Type.
- If the printer is directly connected to a computer, select Port Type USB and Port Auto setup.
- If the printer is shared between multiple computers on the network, select Port Type Ethernet, Port Auto setup, and enter the IP Address from the configuration slip that printed when you turned on the printer. Click Set to Printer.
Note: Lose this slip of paper? Just turn the printer off for a few seconds and hold the feed button while you turn it back on!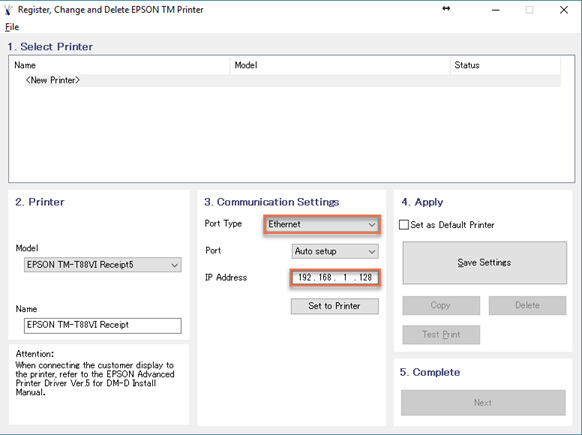
- If the printer is directly connected to a computer, select Port Type USB and Port Auto setup.
- Leave Set as Default Printer unchecked.
- Click Save Settings.
- Select the appropriate Port Type.
- At the PrinterReg prompt, click Yes to perform a test print. Then click OK. Confirm a Windows® test page prints.
Note: This test page won't look like a normal Ascend receipt. That's ok - we're just looking for anything to print at this point! - At the Register, Change and Delete Epson TM Printer prompt, click Next.
- At the Installation Complete prompt, click Close.
Configure the Driver
-
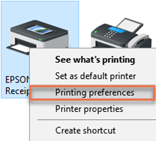
Navigate to Devices and Printers.
Pro Tip: Press the Windows key on your keyboard and type "Devices and Printers" to get there as quickly as possible. - Right-click on the Driver and choose Printing Preferences.
- On the Feed and Cut tab, select the Document[No feed, No cut] Preset option..
![Screenshot of the Feed and Cut tab with Document[No feed, No cut] highlighted](https://static.helpjuice.com/helpjuice_production/uploads/upload/image/13568/2497947/epson_print_prefs.png)
- Click Apply to save your changes.
Configure Ascend
- Navigate to Options.

- In Options > Receipts, Under Type dropdown select: Epson TM Series and under Driver dropdown select: Epson TM-T88VI Receipt (for the "Epson 6" model) or Epson TM-T88VII Receipt (for the "Epson 7" model) as your Driver.
- If you don't see the correct driver, click the Refresh icon (next to the driver dropdown).
- Check Partial Cut.

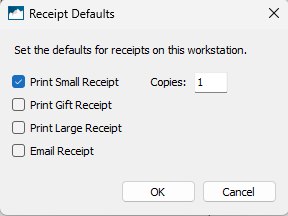
- Click the Defaults button.
- Check the Small Receipts check box and select the number of Copies you'd like to print by default. Click OK.
- You can also set footers for different transaction types. You can access Footers from Options > Receipts > Footers.

- You can create footers for: Sales, Quotes, Layaways, Work Orders, and Returns

- If you're using a cash drawer, head to Options > Sales and Returns > General and check Workstation has Cash Drawer.

- Click OK to close Options and return to the Ascend Desktop. You're ready to start printing!
- Note: Create a blank sale (with no products) and take a Cash payment of $0.00 to test that everything's working as expected.
KB22-086