
Ascend software is compatible with Quickbooks. If you want to use Quickbooks for your shop's accounting, you'll need to set up a Quickbooks account first. Article: Set up a Quickbooks file
After your account is set up, and the Chart of Accounts (COA) is updated, you can add that information to Ascend. Article: Import a chart of accounts into Ascend
The next step is to go into Ascend and map the Categories, Inventory Adjustment Types, Payment Types, Tax Rates and Options with the corresponding General Ledger Account Number from QuickBooks.
Note: (multi-store retailers) Quickbooks account assignments do NOT share between locations - each location must set their own account assignments.
Ascend's retail accountant team also offers Bookkeeping services for Ascend retailers. Learn more here.
Edit Categories for Quickbooks
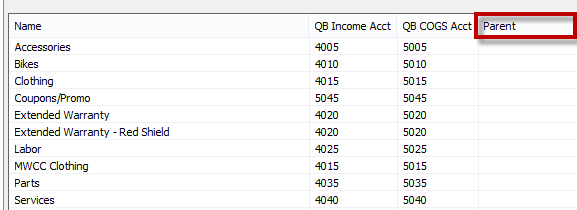
- In Ascend, navigate to Database Explorer > Categories.
- Select the Parent column (click the word Parent specifically!) to sort by Parent categories and place all Parent categories at the top of the list. For the Parent categories themselves, this column should appear blank (because they don't have Parents!).
Note
Ideally, your shop should have no more than 11 Parent categories. - Double-click a category to open the Edit Category window.
- Map each Parent category to an income sales account number, and COGS account number from the Quickbooks' COA that was imported into Ascend.
Note
Do not map your Categories to anything other than Quickbooks income accounts. If you do, your P&L Income value will not match your Ascend Activity Summary. - Check the box for Apply Settings to Child Categories.
- Select Save.
Edit Inventory Adjustment Types for Quickbooks
The reason we map Inventory Adjustments to our Quickbooks accounts is so Quickbooks knows where the offset of the adjustment should go. The inventory asset account mapped in Options is the other half.
- In Ascend, navigate to Database Explorer > Inventory Adjustment Types.
- Double-click on an adjustment type to edit it.
- Update the Quickbooks Account using this chart:
| Ascend IA Type | QB Mapping Options |
|---|---|
| Checked-In transfer item |
|
| Checked-Out transfer item |
|
| Donation |
|
| Excel Inventory File Import |
|
| Merged |
|
| Other |
|
| Owner's Draw |
|
| Reconciled Inventory |
|
| Rental |
|
| Sales/Display Use |
|
| Shop-Use |
|
| Shrink |
|
| Sponsorship |
|
| Traded-In item as payment |
|
| Warranty |
|
Edit Payment Types for Quickbooks
- In Ascend, navigate to Database Explorer > Payment Types.
- Double-click on a payment type to edit it.
- Edit the Quickbooks Account in each payment type using this chart:
| Ascend Payment Type | QB Mapping Options |
|---|---|
| Cash |
|
| Check |
|
| Coupon |
|
| Credit Card |
|
| Credit Memo |
|
| Debit Card |
|
| eCommerce |
|
| Financing |
|
| Gift Card |
|
| Gift Certificate |
|
| In-Store Credit |
|
| PurchaseAccount |
|
| Trade-In |
|
| Trek Card |
|
Edit Tax Rates for Quickbooks
- Navigate to Database Explorer > Tax Rates in Ascend.
- Double-click on a tax rate to edit it.
- Select the appropriate account from the Quickbooks dropdown.
- Select Save.
The State Tax Rate should be mapped to the Quickbooks Account called Sales Tax Payable (OCLIAB). If you have multiple tax rates for City, County, State, etc., they can be listed separately.
Setting Ascend Options for Quickbooks
- Select Options > Quickbooks in Ascend.
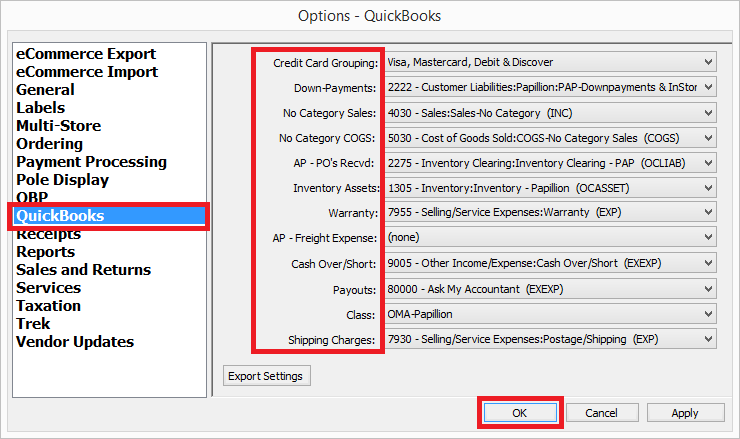
- Set the various dropdowns using the chart below:
| Ascend Option | QB Mapping Options |
|---|---|
| Credit Card Grouping |
|
| Down-Payments |
|
| No Category Sales |
|
| No Category COGS |
|
| AP - PO's Recvd: |
|
| Inventory Asset |
|
| Warranty |
|
| AP - Freight Expense |
|
| Cash Over/Short |
|
| Payouts |
These need to be re-mapped per payout. |
| Class |
|
| Shipping Charges |
This is an offset to freight charges. DO NOT map to an income account. |
Create a Shortcut
This is optional, but might make things a little easier for you.
- In Ascend, select Help > Open Ascend folder.
- Right-click the Export folder.
- From the dropdown menu, select Send to > Desktop to create a shortcut.
The folder Export - Shortcut will appear on the computer's desktop, so you can easily find and access it when needed.
KB22-091