

Starting with Ascend version 26.18 a new permission is required for negative Ascend Pay payments.
As part of our work towards reference returns and security, beginning with Ascend version 26.18 (released 10/14/26) there is an additional permission required for a user to enter a negative amount on an Ascend Pay payment.
This Ascend Pay - Refunds permission already exists in the User Permissions list, but is not assigned to anyone by default. Ask your manager to review the Users/Roles that handle these payment and grant access to those that need it.
Without the permission, a users will see a prompt offering to continue through an authorized user's login when using a negative Ascend Pay payment. Declining the prompt returns the user to the payment screen.

Return a product in a sales transaction
You an easily return an item right from the transaction screen during a normal sale. This can be useful if the customer plans to return one item and immediately purchase another one in its place.
- Select the Return icon.

- In the Previous Sales Item can the sales barcode on the customer's receipt.

- Click Return Items.

- The sales items will appear in the window. Check the items that are being returned.

- Click Add.

- A prompt to give a refund to the original customer appears. Select Yes. If you select No, you will need to attach a different customer to the transaction.

- Once a customer is selected, the return is added to the transaction screen.
Create a Return transaction
- Click the Return icon from the Ascend desktop.
- Depending on your settings, you may be prompted to scan the receipt barcode from the original sale on the Previous Sales Items window.
- If you have the receipt on hand, scan it. If you do not have the receipt, hit Escape on your keyboard, attach a customer to the transaction, and skip to step 8.
- In the Previous Sales Item can the sales barcode on the customer's receipt.
- Click Return Items.
- The sales items will appear in the window. Check the items that are being returned.
- Click Add.
- A prompt to give a refund to the original customer appears. Select Yes. If you select No, you will need to attach a different customer to the transaction.
- Once a customer is selected, the transaction screen opens.
- If you used the Previous Sales Items window, the original price is automatically applied to the product, and the product has a negative quantity.
- If you did not scan the original receipt, you will need to add the product(s) being returned to the sale. Scan the product into the sale. Ascend automatically gives the item(s) a negative quantity.
- The price that appears, though, may not be totally accurate for your customer. Ascend fills in the lowest price - including On Sale prices - the product was ever sold for, to avoid fraud. You can update the price if needed.
- Once product(s) are attached to the Return, you'll notice that the Balance shows up in parentheses, indicating a negative balance, such as (49.99). This means that money is 'leaving' your store and being given back to the customer.
- Now select the payment method you'd like to use to return the total with (such as In-Store Credit, Credit Card, etc.) and close out the transaction.
- Note: Debit payments must be refunded (returned) as Credit. NFC payments may process as Debit and cannot be refunded.
Card issuers/banks may take up to 14 business days to process refunds (returns) to the customer's account.
- Note: Debit payments must be refunded (returned) as Credit. NFC payments may process as Debit and cannot be refunded.
- The items that were returned have now been re-added to your inventory.
Find the original transaction barcode number
If you're following Ascend best practices, and attaching a customer record to every sale, you should be able to find the original transaction even if the customer does not have their original receipt!
- Select the Customers icon or View > Customers from the Ascend desktop.
- Find your customer in the search bar.
- Highlight the customer's name in the results to see their account information.
- Select the History tab.
- Expand the Completed Transactions folder to find the original sale.
- Double-click the original transaction to open it.
- In the transaction screen, select Tools > Copy sales barcode number.
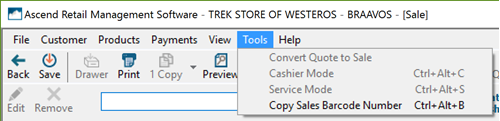
Now you can go back to the Ascend desktop, create a new return, and past the barcode into the Previous Sales Item window.
Additional Resources
KB22-018