
In order to record a multi-point inspection, you’ll need to enter a Serial Number for the customer’s repair item record. This will let you easily keep track of the bike’s entire history in your store – and if your customer happens to have their bike stolen or lost, you can easily look up this information to help them get it tracked down.
Access the form
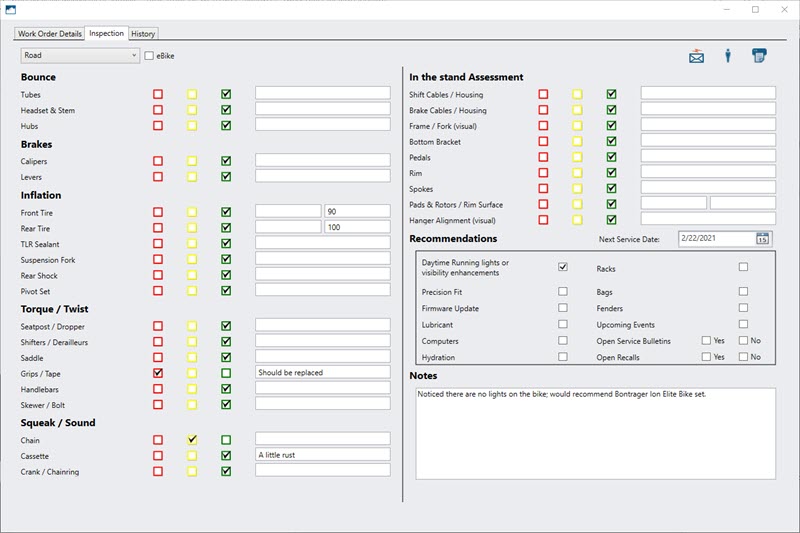
If the customer already has their bike in the store to have it worked on, just select (or start) the Work Order Detail for the repair item and select the Inspection tab.
![]()
If the customer isn’t having other work done yet, but your mechanics give it a quick once-over, you’ll still want to record this – but you don’t necessarily want to take the time to create a full work order until the customer is leaving the bike with you. On the Service Center screen, just click the Inspection button on the toolbar – you won’t be able to convert this inspection to a Work Order, but it’ll be readily available in the customer record under the MPI tab.
![]()
Using the form
- In the Category dropdown, select the closest classification for the bike being inspected.
- If the bike is an electric bike, check eBike.
- For each component, check the box to indicate condition.
- Red: Component is in poor condition and requires immediate attention/repair/maintenance.
- Yellow: Component is in acceptable condition but will require attention/repair/maintenance in the near future.
- Green: Component is in good condition and isn’t likely to require work for some time.
- Enter additional notes/measurements next to each component.
- In the Next Service Date field, enter or select the date the mechanic recommends the bike be brought in next.
Note: By default, the date selected is six months from the date the Work Order Detail or standalone Inspection was created. - In the Recommendations section:
- Check any add-ons which would be beneficial to the customer.
- If there are any store events which may interest the customer in the near future, check Upcoming Events.
- In the Open Service Bulletins field, check Yes or No to indicate whether there are any open service bulletins the manufacturer has issued for their model.
- In the Open Recalls field, check Yes or No to indicate whether there are any open recalls the manufacturer has issued for their model.
- In the Notes field, enter any additional information the customer needs to know.
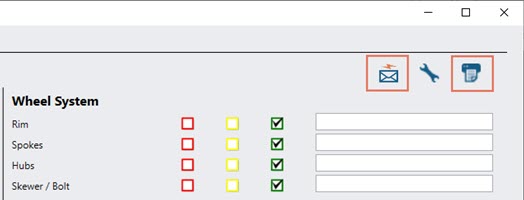
- Click the email icon to email a copy of the inspection record to the customer.
- Click the printer icon to print a physical copy of the inspection record.
Customer View vs Mechanic View
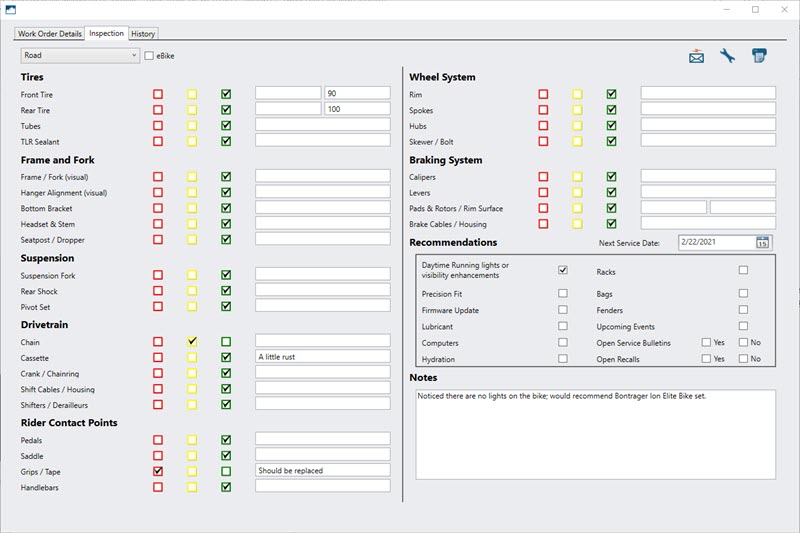
Naturally, your customers will care about different items than your mechanics do, so you can easily toggle the form order based on who’s looking at it. By default, the form opens in Mechanic View – just click the customer icon to list the items your customer is most likely to care about first.
![]()
The customer view has all the same items on it (with your notes, checkboxes, and comments still attached) but lays out the items in a way the customer will better understand. Your customer would probably be confused by a category called Bounce or Squeak, but they can understand a grouping called Tires or Wheel System.
Note
When you print or email the checklist, Customer View is always used.
Click the wrench icon to switch back to the order in which your mechanics process the bike.
![]()
Inspection History
On the Work Order Details screen, select the History tab. From the drop-down menu, select the date of the inspection – the completed form displays in view-only mode. Historical inspections cannot be edited – but if you need to get more details on the Work Order it was entered on, click the barcode icon to copy the barcode for the transaction.
![]()
Additional Resources
KB22-160