
To warranty a product from Trek, a specific setup is needed in Ascend. You will need to create and use:
- A specific labor product to charge for repairs and replacements
- A warranty customer account to track claims in Ascend
Prep your database to process Trek warranties
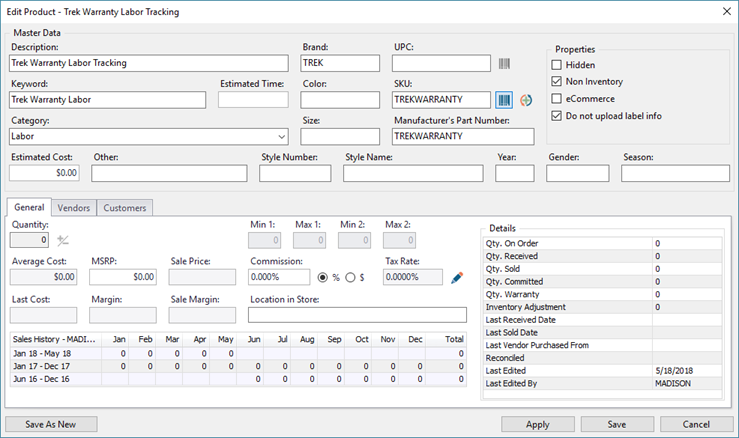
Set up the Warranty SKU:
- Create a non-inventory Trek Warranty SKU using the details below:
- Description: Trek Warranty Labor Tracking
- Brand: TREK
- Keyword: Trek Warranty Labor
- SKU: TREKWARRANTY
- Category: Labor
- Manufacturer's Part Number: TREKWARRANTY
-
Properties
- Non-inventory
- Do not upload label info
- Click Save.
Set up the Warranty customer:
- Select Create > Customer from the Ascend desktop.
- Set these attributes:
- Account Type - Company
- Company - Trek Warranty
- For the Address, fill in Trek's address.
- Set up Purchase on Account.
- Select Active from the Status drop-down menu.
- Set the Credit Limit field to $100,000. You can always change this number (up to $99,999,999.99), if needed.
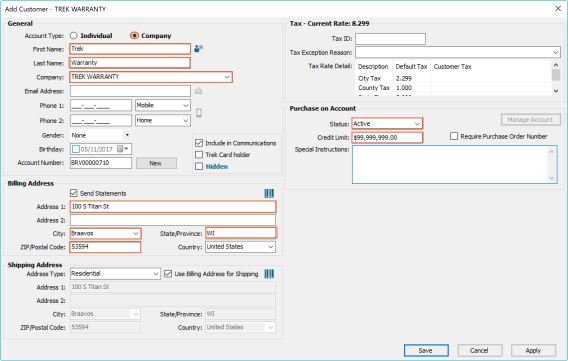
- Click Save.
Once these are set up, you can process with any warranty claims for Trek products. Here's the major "milestones" in a Trek warranty claim process:
Submit the claim to Trek's B2B
Claims need to be submitted through B2B within 60 days of completing the Work Order.
- Log into B2B
- Select the RETAILER SERVICES tab.
- Click Service/Warranty Claim.
- Select Start Warranty Claim.
- Complete the claim information and submit it. Make note of the Claim Number.
Submit a claim to Trek's B2B using the EA 520
- Ensure your EA 520 inventory scanner is charged and ON.
- From the device home screen, open Settings, then select Scanner Settings.
- Enable the scanner by switching the toggle on the top right of the screen to ON and enable the Keyboard output mode by checking the box.

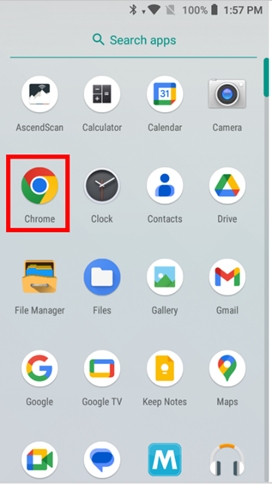
4. Once both options are enabled, press the device’s home button to return to the home screen and open the Chrome browser app.
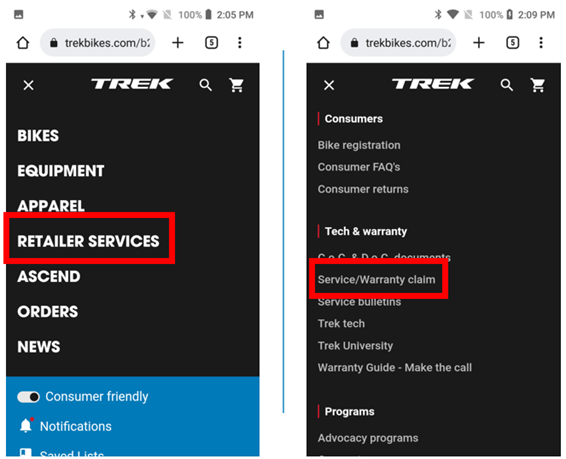
5. From your device, navigate to www.trekbikes.com and log in to your Trek B2B account. Then, head to Retailer Services and select Service/Warranty Claim. For quick access in the future, bookmark this page.
6. Begin filling out your warranty claim. Use the scanner to populate the Product Detail section with the SKU/serial number. Select Upload image, and under Choose an action, select Camera to take pictures of all damages and the product serial number.
7. After you’ve verified all the information, click Submit Claim.
8. Once all your warranties have been completed, you’ll need to disable Keyboard output mode from the Scanner Settings menu in Step three before it can be used with AscendScan again.

Record the claims details in Ascend
- Create a new Work Order in Ascend.
- In the serial number prompt, enter the serial number. This will automatically pull up the customer's information (if they have a customer record attached to this serial number).
- Add the Trek warranty labor SKU to the Work Order Detail.
- If needed, add a Due Date or any other parts required for the repair.
- Select Save or Save & Print.
This sets up your Work Order Detail correctly, so that the bike stays connected to the correct customer. But the Work Order transaction itself needs to be connected to the Trek Warranty customer, so Trek can pay for the repairs. - Select Customer > Select or hit F11 on your keyboard.
- Find and select the Trek Warranty customer account.
- If applicable, add any discounts to the Work Order.
- In the Comments field, write down the claim number.
Charge the store's warranty customer account
Once the work is completed and the customer is leaving with their bike, you can charge the Work Order to Trek Warranty's POA.
- Open the Work Order you created earlier (for customer Warranty, Trek).
- Select the Account icon from the payment types.
- Next to Purchaser, click the magnifying glass icon and search for the customer who owns the bike.
- Enter the claim number in the Purchase Order # field.

- Click Save.
Reimbursements
After a claim has been reimbursed to your shop by Trek, you can enter that information into Ascend.
- Select Tools > Purchase on Account > Manage from the Ascend desktop.
- Double-click the customer: Trek Warranty.
- Check the box next to the Work Order that was reimbursed by Trek
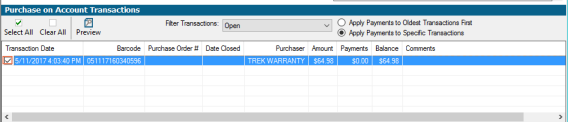
- Select the payment type Check.
Note: Credits will be issued to your Trek account. Use the Check payment type to account for this - Trek will not send reimbursements as a check. - Select Save.
KB22-200