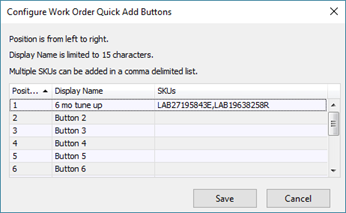
Quickie buttons allow users to add multiple common labor items and/or components to a repair with just a single click. Each store manages their Quickie buttons separately, so these items can be as unique as your locations, but they share across all workstations in your store.
To get started, open any work order and access its Work Order Details screen. Click the pencil icon above the Quickies buttons.

You can configure up to 12 Quickies buttons. When you’ve finished editing, just click Save.

Note: Have more than 12 packages? Kits are a great alternative, and there’s no limit to the number of Kits you can set up in your system. You can create a custom SKU for each kit and/or print out labels to keep at each workstation.
Changing button names
Click in the Display Name cell and type your desired name. Up to 15 characters (including spaces) can be entered.
Changing button positions
Buttons cannot be reordered. Be sure to enter the button configuration in the Position where you want it to display.
Position 1 is the first button on the left side of the top row, Position 6 is the last button on the right side of the top row, Position 7 is the first button on the left side of the bottom row, Position 12 is the last button on the right side of the bottom row.
Configuring SKU list
Click in the SKUs cell and scan or type the SKUs you want to include. Separate SKUs with a comma.
Note: Have services that combine multiple labor packages? Set up a Kit for each package, then add the kits to the Quickie button for the service.
Removing Buttons
What if you don’t need all 12 Quickie buttons? No problem! You could simply leave them as-is – if pressed, they’ll do nothing, so there’s no harm in having them. But if you want to clean up the screen to avoid any confusion, all you need to do is delete the text from the Display Name and SKUs columns.
The buttons will be hidden, not fully erased, so you can simply edit them again to add a button back in.
KB22-157