
Multi-store shops are able to request products from their sister locations when needed. Some chains might even have one location do all the buying, and then ship products to the other locations from there.
Multi-store transfers in Ascend help move products between stores with just a few clicks.
Remote Product Lookup
- There are a few places you can request a transfer:
- select Multistore > Remote Product Lookup from the Ascend desktop,
- in the Multistore tab in a Product record by selecting the Request or Send to checkout icons,
- and by highlighting a product in a transaction and selecting Products > Remote Lookup.
Right now, we're going into the Remote Product Lookup window (which can be accessed from the Ascend desktop or in a transaction).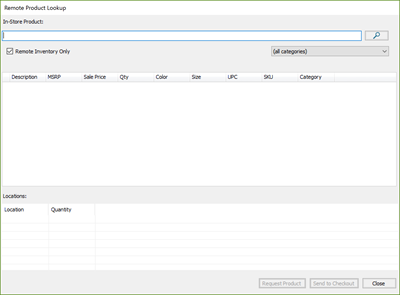
- Use the search bar to look for the product using SKU, UPC, or Description.
- Narrow your search with the Category dropdown, if needed.
- Check the Remote Inventory Only checkbox to see results where at least one other location has at least one item on hand. It won’t show a product if its quantity on hand (QOH) is zero at all other locations - even if your location does have the product on hand.
- Highlight a product in the search results to see its Quantity at your other locations.
- Highlight one of the locations in the lower part of the screen (ideally one with a QOH greater than zero if you are requesting product).
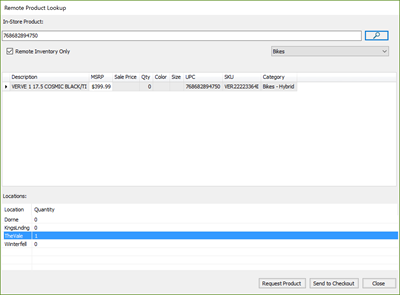
- Select Request Product to request the highlighted product from the highlighted location or Send to Checkout to send the highlighted product to the highlighted location.
When you request an item or send an item to checkout, the Transfer Product window opens.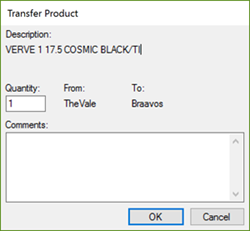
- Update the Quantity field, if needed.
- Verify the From and To locations.
- Add any Comments here (for example: if this is for a specific customer or needed by a certain date).
- Click OK to complete the request.
Checking pending items
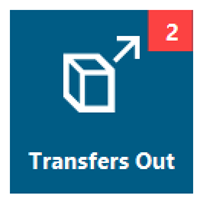
On the Ascend desktop, the Transfers In and Transfers Out tiles display the number of items which require attention.
Find information in the Check In/Out Transfers screens
Check on the status of your pending transfer by navigating to Multistore > Check-In Transfers or Check-Out Transfers. Both screens look the same and have the same icons. Check In just shows items coming into your store, while Check Out just shows items leaving your store.
You can toggle the text size on the Transfers Check-In and Out screens by selecting the Toggle Text Size icon.

Use the Location dropdown to filter by location, if needed.
Use the View dropdown to filter by the transfer status if you like.
You can also identify a product’s status by the icon to the left of it - which match the icons at the top of the window. Or scroll over to the right to see the dates the status changed. If a status column is blank, the item is still waiting for that step in the process.
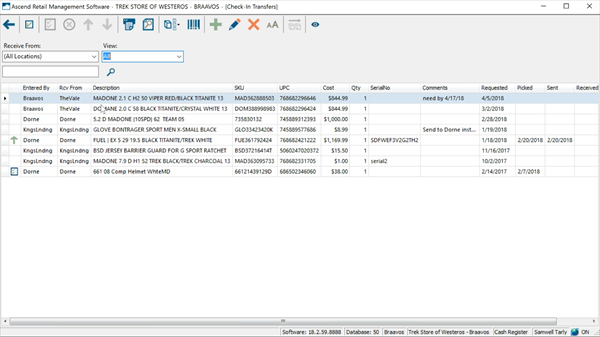
Another filtering option is by using the search bar to search for specific keywords.
Customize your view.
- Drag and drop columns into the order you'd like to see them.
- Right-click on any column header to select the Column Chooser from the dropdown menu to update which columns appear.
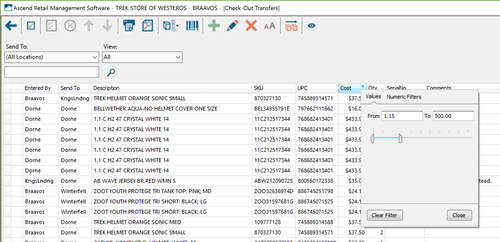
- Use the icons in the upper right corner of each column to filter even further. This includes Date ranges for different statuses, Cost ranges for items, and more.
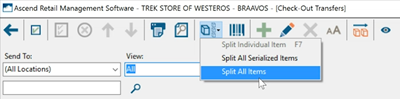
You can also split items by clicking Split > Split all Serialized Items, or Split > Split All Items. If you have a product with a quantity greater than one highlighted, Split > Split Individual Item will also be available.
Use the icons in the Check In/Out Transfers screen
Even though we’re giving you a run-through of the buttons now, we don’t expect you to have them memorized! If you’re ever unsure what an icon does, just hover your mouse over the icon to receive a helpful prompt.


Toggle selection icon: Select all line items. Or you can select just a few items by holding Control on your keyboard and clicking the products.

Receive icon (or hit F4): Highlight the product and select the to mark it received and complete the transfer. This icon is only available on the Check-In Transfers screen.

Pick: Select to change the product status to pulled from inventory for transfer. This icon is only available on the Check-Out Transfers screen.

Send: select when the items are being sent to the other location. Note: Items do not have to be “picked” in order to send. This icon is only available on the Check-Out Transfers screen.

Deny: Select if a requested product is not available for transfer and this will remove it from your requests. This icon is only available on the Check-Out Transfers screen.

Remove: Select to cancel a request that was created at your location - for sending or for receiving an item. All deleted products are visible under Abandoned in the View dropdown.

Print & Print Preview: These icons will print the current items you can see, depending on the filters and columns you use.

Click Print Labels to print labels for the selected products.

Add: Select to create a new Transfer request

Edit: Select to edit a current Transfer request. Note: If the request was not created at your location, most of the fields on the Edit Request window will be grayed out.
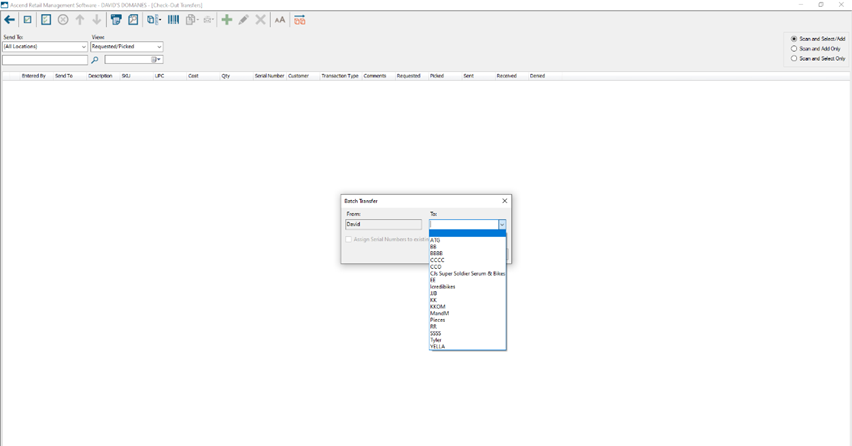
Create a Batch Transfer
Use the Batch Transfer icon to transfer items.
Use smaller batches for increased data integrity
We recommend limiting batch transfers to a couple hundred products at a time to reduce the chance of any communication disruption resulting in a partially sent transfer.
![]()
1. Run the following query in Ascend to get the results from the scanned files:
WITH SerialNumberScans
AS
(SELECT InventoryScan.ItemID, Products.TopicID, [Topic] = Categories.Topic, [ProductID] = Products.ID, Products.Description, Products.UPC, [SKU] = PRoducts.[Store UPC]
FROM InventoryScan
LEFT JOIN SerialNos on InventoryScan.ItemID = SerialNos.Id
LEFT JOIN Products on SerialNos.ProductID = Products.ID
LEFT JOIN Categories on Products.TopicID = Categories.ID
WHERE InventoryScan.DateCreated BETWEEN <<StartDate>> AND <<EndDate>>
AND InventoryScan.ScanType = 1
AND InventoryScan.Hide = 0)
SELECT [Qty , UPC/SKU] = CAST(InventoryScan.Count as nvarchar) + ',' +
CASE
WHEN InventoryScan.ScanType = 1
THEN Coalesce(NULLIF(SerialNumberScans.UPC,''),SerialNumberScans.SKU)
ELSE Coalesce(NULLIF(Products.UPC,''),Products.[Store UPC])
END
,[SectionNumber] = InventorySection.Number
FROM InventoryScan
LEFT JOIN InventoryGroup ON InventoryScan.InventoryGroupId = InventoryGroup.ID
LEFT JOIN InventorySection ON InventoryGroup.InventorySectionId = InventorySection.ID
LEFT JOIN InventoryEvent ON InventorySection.InventoryEventId = InventoryEvent.ID
LEFT JOIN Products ON InventoryScan.ItemId = Products.ID
LEFT JOIN SerialNumberScans ON InventoryScan.ItemID = SerialNumberScans.ItemId
WHERE InventoryScan.DateCreated BETWEEN <<StartDate>> AND <<EndDate>>
AND InventoryScan.Hide = 0
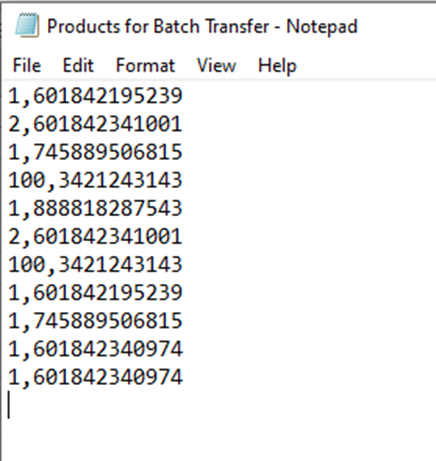
ORDER BY InventorySection.Number2. Export the results to an XLSX file, and open it in Excel, Google Sheets or Excel online.
3. Copy the column titled ‘Qty, UPC/SKU’ without the header
4. Paste the column into a blank Notepad.
5. Save the document.
Then, select the Batch Transfer icon to find and select your document. In the popup window, indicate which locations you are sending the products to, and click Okay.
If there are any errors during the import, you’ll receive a popup letting you know. Otherwise, the items will simply be added to your Check Out Transfers window.
If you’ve scanned products with an MC2180* inventory scanner, the scan file created is already in this format.
*The MC2180 device is unsupported by the Ascend support team.
Transfers in purchase orders
Navigate to Database Explorer > Orders and open or create a vendor order.
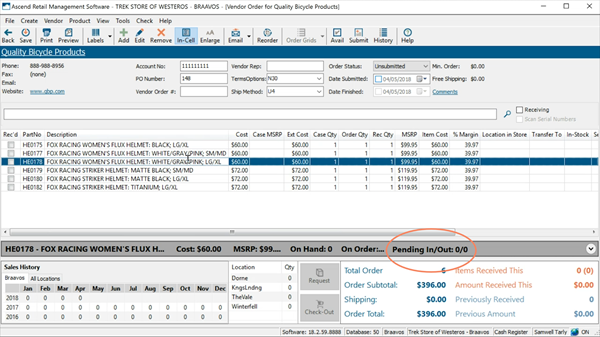
If you highlight a product in the purchase order, you can easily see if there are any pending transfers for it with the Pending in and out field on the information bar.
And, if you’re ordering some vendor products for another location, you can easily mark it for transfer here using the Transfer To column. Make sure the In Cell editing icon is active, and then select the dropdown arrow in the Transfer To column for your item. Next, choose the location the item should be sent to.
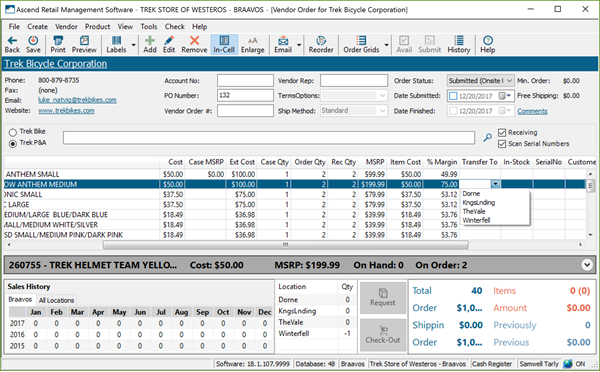
If you accidently select the wrong one or need to clear this field, just select the field and hit Backspace or Delete on your keyboard.
Save the order to officially mark that item for transfer.
Transfers in a transaction (instead of a Special Order)
In a transaction, if a product that is added to the sale is out of stock, multi-stores have the option to mark the sales item for transfer, instead of marking it for Special Order from a vendor. Article: Handle Special Order items
- When you add the product to the sale, you get the Special Order popup.
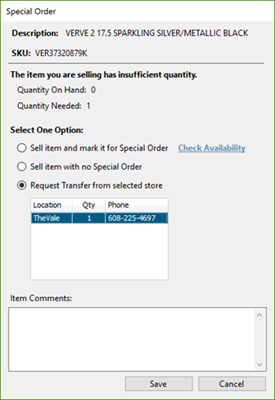
Locations with the appropriate quantity on hand display in the lower part of the popup. For example, if you are requesting two of an item, then only locations with two or more on hand will display. You cannot request transfers from multiple locations here. - Select the radio button for Request Transfer from selected store.
- Highlight the location you'd like to request a transfer from.
- Add any Item Comments if needed.
- Click Save.
- The Transfer product popup appears.
- Verify the information and add Transfer Comments, if needed.
- Click OK.
The item is added to the transaction and marked for transfer.
Additional Resources
KB22-192