When adding or replacing a computer in your shop, you probably want to be able to use Ascend on it. Luckily, we've made it easy for you to set up Ascend on your new workstation.
Install a new workstation
Check Ascend requirements for hardware & peripherals to ensure your computer meets your needs for running Ascend.
If your store’s server requires replacement, you must schedule your upgrade with an Ascend support technician (phone: 877-875-8663, or help@ascendrms.com). This process can take up to three hours and Ascend cannot be used during this time. So, please schedule at least one week in advance.
- Configure the Windows® settings for Ascend on the computer. This will head off most setup problems from the start!
- Install and configure the Ascend client (see steps below)
- Add and assign unique workstation names to each computer (see: Set up workstation names). Not only will this give you better reporting, but most peripherals require a separate workstation name so that they can set their options correctly.
- Install and configure any peripherals the workstation needs. (See: Ascend requirements for hardware & peripherals)
- Plug in and set up barcode scanners. (See: Set up a barcode scanner)
- Install an Epson receipt printer. (optional) Add a logo to your receipts. (See: Install the receipt printer, Add a logo to the receipt printer)
- If you have a cash drawer, simply plug it into your receipt printer and make sure you check Options > Sales and Returns > General > Workstation has Cash Drawer.
- Ingenico payment terminal. (optional) Display custom images on the screen. (Install the (Ingenico) payment terminal, Add a custom image to the (Ingenico) payment terminal)
- Install a Zebra label printer.
- Run through a “test” transaction with no products and a $0 cash payment.
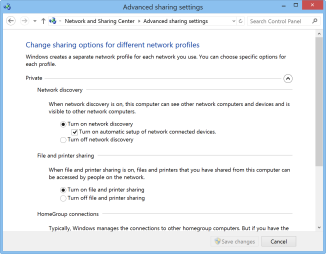
Make sure the computer is part of your network group
- Go to the Network and Sharing Center on your computer.
- Select Change advanced sharing settings.
- Expand the Private section.
- Check Turn on network discovery.
- Check Turn on file and printer sharing.

- Expand the All Networks section.
- Check turn off password protected sharing.
- Click Save Changes.
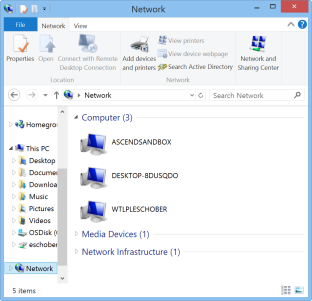
You can easily see if your computer is available on your network group by follow these steps:
- Select the folder icon on your computer's taskbar.
- Click Network on the left.
- Under Computers, you should see the names for your other computers appear.

Install Ascend on the workstation
- Download the appropriate Ascend Client installer (log into www.ascendrms.com).
- Select the file. You may be asked if you want to run it. Click Yes.
- Follow the Ascend install prompts to add Ascend to this computer.
Once it's installed, you should be able to select the Ascend program. When the program opens, it will notify you that it is not connected to the server.
Connect to the Server computer
- Get the name of the server computer. You might recognize it in the Network folder on your workstation.
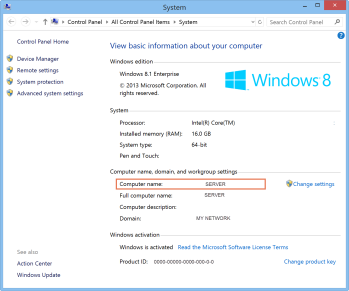
- Otherwise, go the server computer.
- Select the Start icon on the server computer
- Type system and select System from the results.
- Under the section Computer, domain, and workgroup settings, you'll see computer name with the server's name next to it.

- Go back to the new computer.
- In Ascend on the new workstation, select Show Servers.
- Select Add.
- Type in the server computer's name.
- Select Save.
Ascend will search for, and hopefully connect to, the server computer in your shop. If it is not able to find the server by name, call the Ascend Support Team.
Your computer may need to be connected using the server's IP Address, or there might be a networking issue on the new workstation.
Set up a unique workstation name for the new computer
It's important to assign a name to each workstation in your shop so that they can be easily identified on reports, workstation specific options can be configured, and you can easily cash out your registers at the end of the day. Learn how to Set up workstation names.
FAQs and Troubleshooting
Q: How do I get to the Network and Sharing Center on my computer?
A: Click the start menu on your computer and start typing Network and Sharing Center. Select the Network and Sharing Center from the results.
KB22-229
