
Before you begin - Verify your Ascend Location details
The Location details in your local Ascend system must be filled out before adding Ascend Pay to that location on HQ.
To verify your details, head to Database Explorer > Locations. Insure location Phone and Address fields are saved and accurate.
Any missing details will prevent you from registering a retail location. A red notification will display in the Messages field on HQ. To find the source of the issue, click on the notification. A pop up window will describe what information is missing. Fill out the information in your local Ascend client to move forward.
It's crucial that you follow these steps in order. Wait for verification when instructed. Skipping ahead will require restarting the process.
Fill out your Legal Entity Details
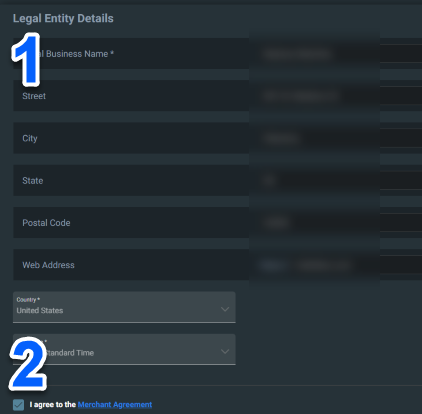
Log into Ascend HQ. Navigate to Settings > Integrations > Payment Integrators and select Ascend Pay from the drop down menu.
- Enter your Legal Entity Details.
- Check the box to agree to the Merchant Agreement.
- Wait a few minutes for account authorization.
Register locations
Once your Legal Entity Details have been authorized, it's time to add a location!
Add a Location
- Scroll down from Legal Entity Details on Ascend HQ.
- Expand the Locations menu.
- Find your desired location.
- Click the Add Location to the right of the desired location.

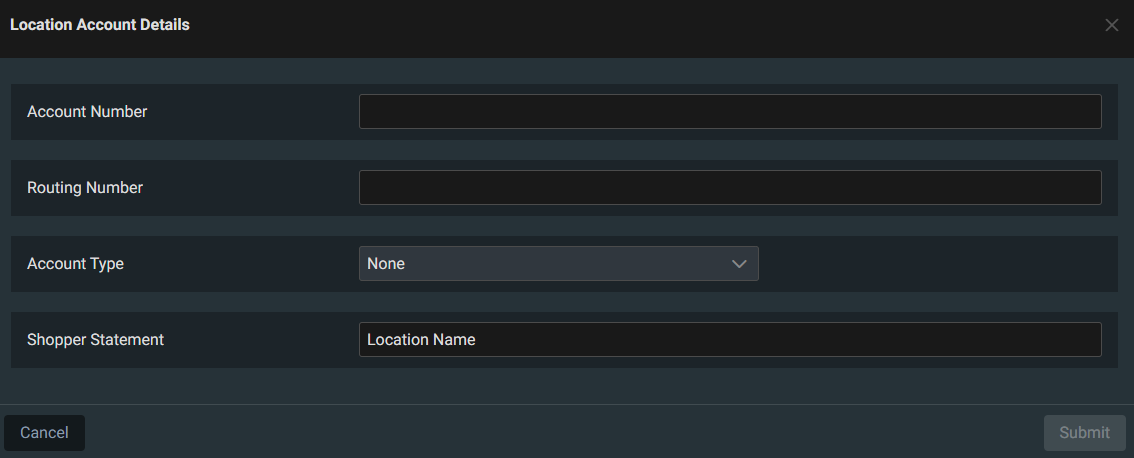
Fill in the Location Account Details
- Fill in the Account Number, Routing Number, and Account Type for the bank account you wish to use for this location.
-
Shopper Statement is how you'd like Ascend Pay to refer to this location.
- This is the business name that will appear on the consumer bank statements for payments taken at this location.
- Shopper Statement can be a maximum of 22 characters long (including spaces).
- Changes to this field after submitting will require assistance from the support team.
- Click Submit.
Unable to Submit?
Shopper Statement can be a maximum of 22 characters long (including spaces). Shorten your shop's name. The Submit button will activate.
Payment Methods
- After your location has been successfully added, eligible payment methods will automatically be added to your location.
- Click the info icon in the Payment Method column to view available methods and current status.
- If you'd like to remove a payment method, please email support@ascendrms.com for assistance.
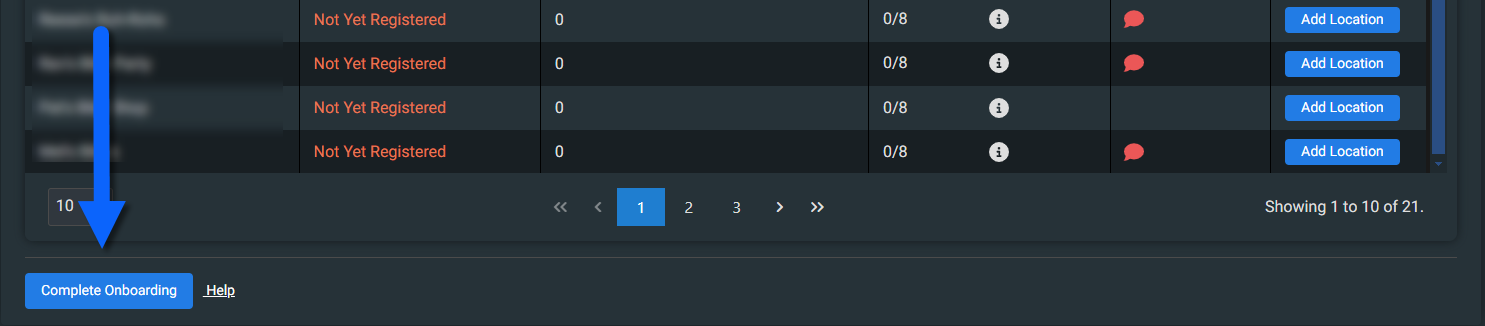
Complete Onboarding
Important Note
The Complete Onboarding button does not appear until your business has been validated and has at least one registered location.
Click the Complete Onboarding button beneath the list of Locations
- This will open a new tab where you have to fill out the information below.
-
Note:
- Have the documents mentioned in this article ready at this time.
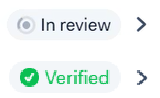
- After submitting each section below, they may stay In review for 1-2 business days before being Verified.
- Only add one Payout Details to start. Wait for verification. Adding more before verification will result in errors.
Company Details
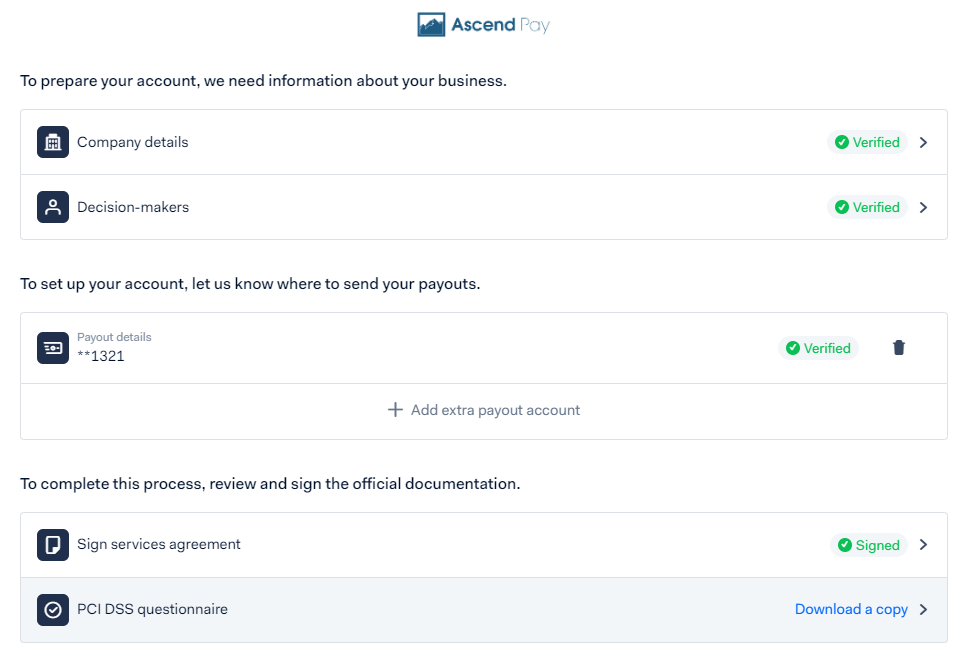
- Click Company Details near the top of the new tab.
- Fill out each of the following. When done with each step, click Next on the bottom right of the page.
- Name and Country
- Company structure
- Registration details
- Address
- Registration documents may be required
- US: Certificate of Existence or Certificate of Good Standing.
- Canada: Certificate of Incorporation.
- Review the Summary section. If everything looks good, click Submit.
Decision-makers
- Click Decision-makers (button underneath Company Details on the Overview page).
- Click + Add decision-maker.
- Have your birthdate and your Identification Number ready!
- You must fill out ALL of the following roles:
- Owner
- Controlling Person
- Signatory
- Canada and Australia will also need to fill out Director.
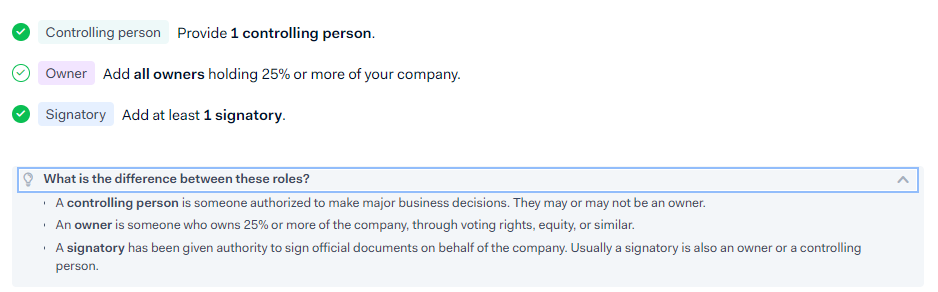
- Fill out fields according to the definitions found here.
- For each role, click Next
- Fill out your Address and click Next.
- After ensuring all of the information is correct in the Summary section, click Submit.
Payout Details
- Find Payout details near the middle of the page.
- The bank account associated to your location on Ascend HQ will automatically display.
- Click into the Payout Details of the existing account.
- Click Next.
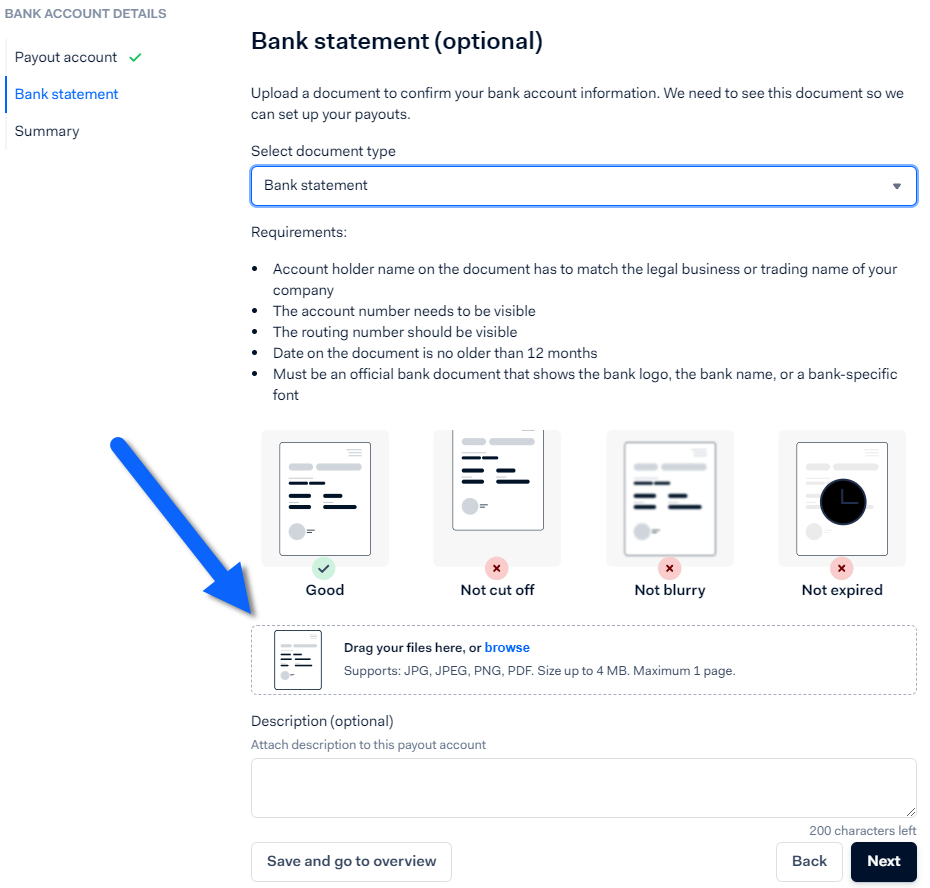
- Select Bank Statement from the drop down menu.
- Drag a JPG, JPEG, PNG, or PDF of your bank statement to the box as instructed (see image to the right).
- Click Next.
- Review the Summary and click Submit.
Do not click + Add extra payout account
If you have more locations you want to sign up for Ascend Pay, follow the instructions in the Add additional locations section below.
Review and sign the official documentation
- To finalize your account registration, sign both the Services Agreement and the PCI DSS Questionnaire
 on the bottom of the page.
- Reminder: Wait 1-2 business days for processing. Sections will change from In Review to Verified upon successful processing.
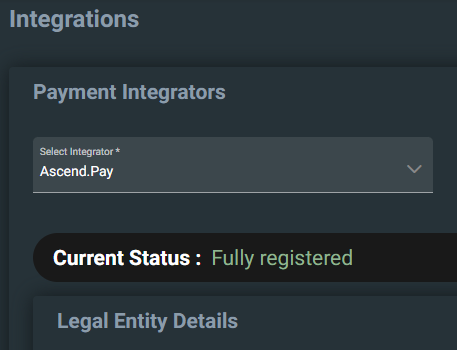
- Once verified, log into Ascend HQ.
- Current status under Payment Integrators > Ascend Pay will show as Fully Registered.
Ascend Pay location statuses
| Not Yet Registered | Location registration process has not started. |
| Registration Process Started | Store and balance account created at integrator, bank account not yet associated. At this point, the Shopper Statement can no longer be updated. |
| Bank Account Registered | Bank Account associated at integrator, but other steps incomplete. |
| Completing Onboarding at Vendor | All objects registered at integrator, waiting for completion from integrator. |
| Errors with Onboarding | There will be errors from the integrator to follow up on. |
| Onboarding Rejected | The integrator rejected the location. |
| Fully Registered | The location can now start setup in the client. |
Add additional locations
A single, fully-registered location is required before adding additional Ascend Pay retail locations.
Once one is added, follow the steps within the Register locations and Payout Details sections above as many times as necessary to start using Ascend Pay at all of your locations!
Next steps
Need credit card terminals? Get them here.
You've got the terminals and need to install them? Check this out!
KB24-004